I decided to start cataloging my 1/56th scale vehicle collection. Some of my favorite pieces from that collection are French tanks and vehicles. Below are some shots of them. Hope you enjoy! All of these kits are from Army Group North's range of 1/56th scale kits.
Char B1.
Somua S-35.
Renault R-35s.
Panhard Armored Car.
A wargaming, modeling, and miniature painting blog. These days focusing primarily on projects set in the Warhammer 40,000 universe, but not necessarily using those rules. Also the home of the Betrayal at Badab project, a rules mod for Horus Heresy: Betrayal at Calth
Friday, June 24, 2011
Sunday, June 12, 2011
Modular Game Table System Tutorial.
Hello folks,
This weekend I had some time to take some pictures of my terrain collection and post a basic tutorial for a simple, extremely modular and adaptable, fast, and (I think) good looking table layout. Besides being relatively cheap it also features trees that can be placed anywhere and without bases. This tutorial is an expansion of my earlier Modular Forests tutorial and can be used in conjunction with the Hedgerow tutorial as well. If you are feeling particularly adventurous and want to build your own 28mm houses, can also give this Normandy Farm project a try.
Things you will need:
Interlocking foam tiles. You will need as many of these as necessary to lay out your whole table. Most of these are sold in packs of four 2'x2' squares. The color does not matter (mine are gray).
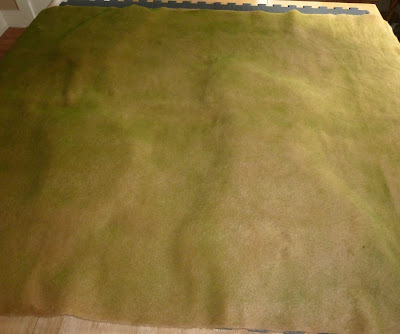
A game mat. Almost any kind will do. I have both a GW static grass mat as well as several yellowish/brown plush felt mats oversprayed with green floral spray. Almost any kind will work though.
Trees. For this you will need trees without bases, but with a hole drilled in the bottom and a pin inserted to the depth of the gray foam mats you will be using under the table. This pin technique can be used also for all kinds of things, including road signs, telephone poles, street lights etc. etc.
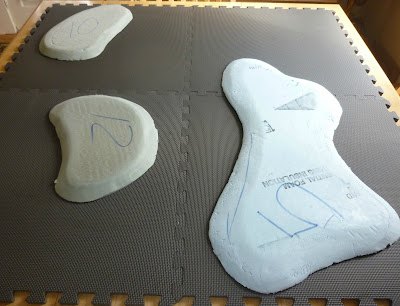
Foam hills (unpainted). These can be all kinds of shapes, thicknesses, and sizes. However, be warned that game mats used on top of these kinds of features do not always lay smoothly without wrinkles. Generally, the more curvy and intricate the terrain, or the higher you stack the hills underneath, the harder it is for the mat to lie smoothly. I recommend that you use pink or blue styrofoam insulation in 1" thickness with gentles slopes cut into the sides and sanded as smooth as possible to give a nice gentle slope and contour.
Terrain. Whatever else you would normally use on your game table. Walls, buildings, hedges, rocks, craters, you name it...it can be used just like you normally would on any other game table.
Limitations: There are a few considerations for this system. Things to think about before you make the plunge:
1. Trees: You will need to remove the bases from all of your trees and drill holes into the trunk and insert pins. This means you will have sharp object sticking out of whole boxes of trees. The good thing is that they store easier. The bad thing is that you can poke your fingers. I haven't hurt myself or anyone else yet... But there it is. I would suggest trying it with a few spare trees and see if you like it first before you take the plunge.
2. Rivers and major contours: Like I mentioned before, the game mats might prove difficult to lay smoothly on very intricate surfaces. If you are planning on using lots of cuts such as riverbeds, steep slopes, high hills, and anything unusually shaped or contoured, you will have problems getting the game mat to lie smoothly. In this case, you might want to consider making foam hills and covering them with the same material the mat is made out of or some other solution.
And that's about it...I can honestly say that after several months of using this system at our local game club, I have found it to be easy to store in my car, simple to set up and take down, insanely easy to adapt to all different kinds of scenarios and uses, and has the bonus if being some of the sharpest looking layouts you can get short of creating permanent scenic tiles with special terrain features. It is a great all around modular terrain system.
Now...on to the pics:
This is a simple "how to" series of pics that shows each layer of the system.
Layer 1: The interlocking gray foam tiles in a 4'x4' square.

Layer 2: Hills paced on top.
Layer 3: Game mat placed on top.
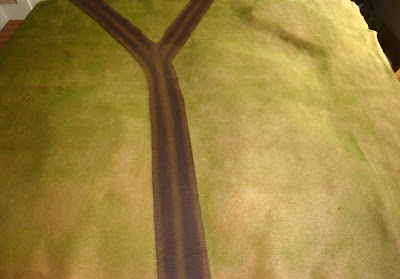
Layer 4: Roads added.
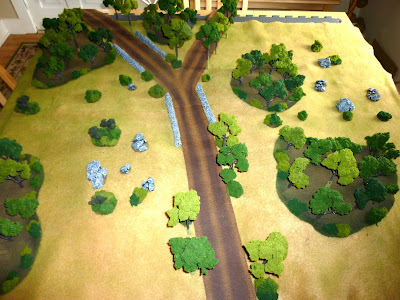
After this, add scenic items as needed. The following photos show how the same system can be changed from one type of table layout to another simply by adding elements and moving things around a little bit.
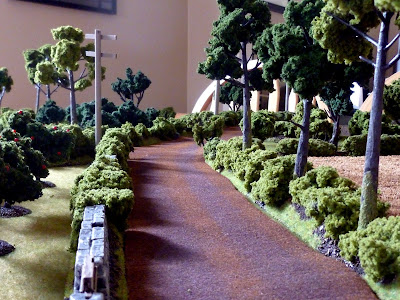
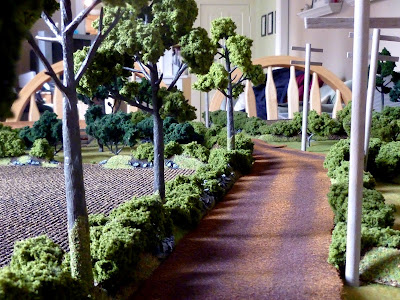
The first series of photos shows a generic wilderness type table with a road going through it. The hills are covered in trees and the open areas with rocks and bushes and other kinds of growth. The forests here are dense with trees.
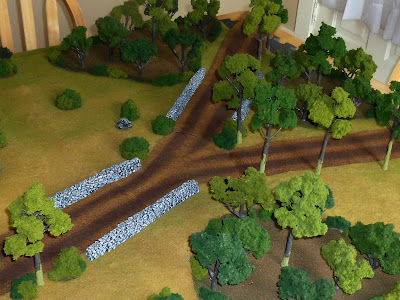
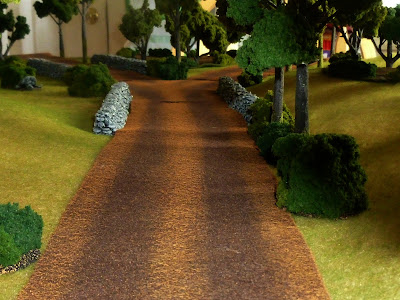
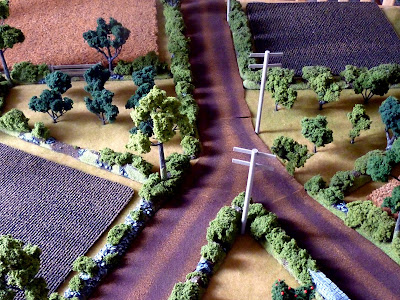
Now take the same table, remove the forests, put down some hedgerows and cultivated fields, add trees to the hedges, and you have a nice compact Normandy Bocage table.
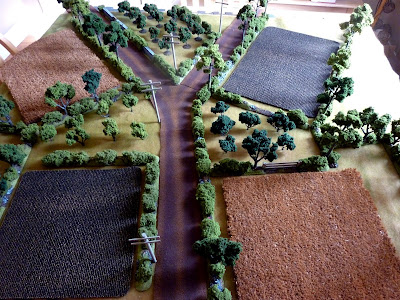
Normandy Road Junction.
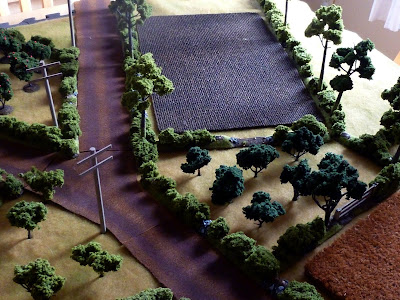
Looking from the other direction.
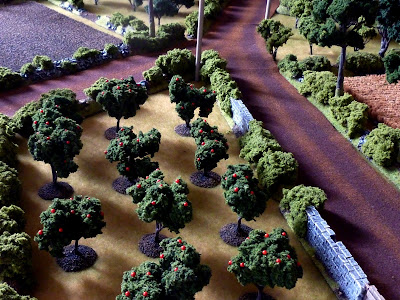
Small Normandy Apple Orchard. Probably making Calvados...
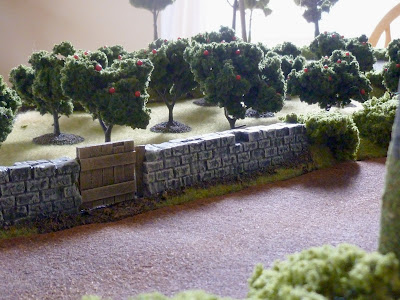
Orchard Gate.
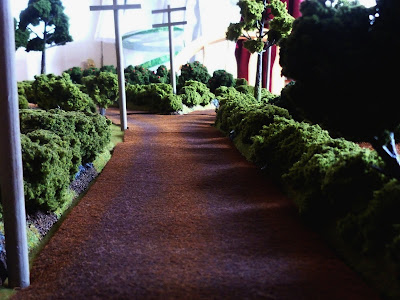
A country lane in the Bocage.
Sleepy farm country.
Somewhere outside Caen.
Some useful tips should you decide to give this system a try:
You can do forest templates for dense forests with lots of trees and undergrowth, or you can do nice open areas of terrain with only a few sparse trees here and there and both will give a very natural look. It is also really easy to do tree lines without hedges simply by placing trees in a straight line between fields and putting a few random bushes along with them.
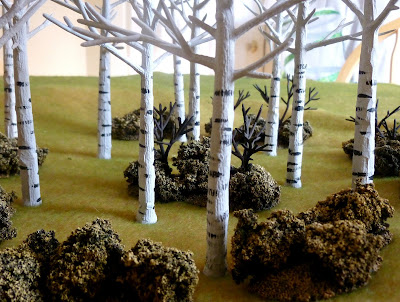
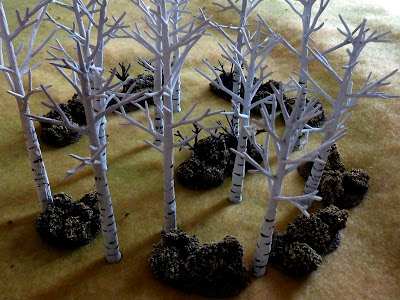
You can switch to an autumn or winter board simply by laying down a different game mat and/or using bare or evergreen trees. I am experimenting with some white birch trees to do games set on the Eastern Front in WWII or in North America during the F&I or AWI.
With this system you could potentially do sunken roads, dry riverbeds, or rivers by cutting these features into blue or pink foam or buying extra gray foam tiles and cutting them as needed. If you cut out the riverbed, lay down the game mat, and then place your river inside the sunken part it helps create the 3D effect that is so difficult to achieve on flat tables. I am just beginning to experiment with this and will post about it when I come up with something I am happy with. The tests so far have been promising.
And that's it. I hope this helped to describe the terrain system and show how easy it is.
This weekend I had some time to take some pictures of my terrain collection and post a basic tutorial for a simple, extremely modular and adaptable, fast, and (I think) good looking table layout. Besides being relatively cheap it also features trees that can be placed anywhere and without bases. This tutorial is an expansion of my earlier Modular Forests tutorial and can be used in conjunction with the Hedgerow tutorial as well. If you are feeling particularly adventurous and want to build your own 28mm houses, can also give this Normandy Farm project a try.
Things you will need:
Interlocking foam tiles. You will need as many of these as necessary to lay out your whole table. Most of these are sold in packs of four 2'x2' squares. The color does not matter (mine are gray).
A game mat. Almost any kind will do. I have both a GW static grass mat as well as several yellowish/brown plush felt mats oversprayed with green floral spray. Almost any kind will work though.
Trees. For this you will need trees without bases, but with a hole drilled in the bottom and a pin inserted to the depth of the gray foam mats you will be using under the table. This pin technique can be used also for all kinds of things, including road signs, telephone poles, street lights etc. etc.
Foam hills (unpainted). These can be all kinds of shapes, thicknesses, and sizes. However, be warned that game mats used on top of these kinds of features do not always lay smoothly without wrinkles. Generally, the more curvy and intricate the terrain, or the higher you stack the hills underneath, the harder it is for the mat to lie smoothly. I recommend that you use pink or blue styrofoam insulation in 1" thickness with gentles slopes cut into the sides and sanded as smooth as possible to give a nice gentle slope and contour.
Terrain. Whatever else you would normally use on your game table. Walls, buildings, hedges, rocks, craters, you name it...it can be used just like you normally would on any other game table.
Limitations: There are a few considerations for this system. Things to think about before you make the plunge:
1. Trees: You will need to remove the bases from all of your trees and drill holes into the trunk and insert pins. This means you will have sharp object sticking out of whole boxes of trees. The good thing is that they store easier. The bad thing is that you can poke your fingers. I haven't hurt myself or anyone else yet... But there it is. I would suggest trying it with a few spare trees and see if you like it first before you take the plunge.
2. Rivers and major contours: Like I mentioned before, the game mats might prove difficult to lay smoothly on very intricate surfaces. If you are planning on using lots of cuts such as riverbeds, steep slopes, high hills, and anything unusually shaped or contoured, you will have problems getting the game mat to lie smoothly. In this case, you might want to consider making foam hills and covering them with the same material the mat is made out of or some other solution.
And that's about it...I can honestly say that after several months of using this system at our local game club, I have found it to be easy to store in my car, simple to set up and take down, insanely easy to adapt to all different kinds of scenarios and uses, and has the bonus if being some of the sharpest looking layouts you can get short of creating permanent scenic tiles with special terrain features. It is a great all around modular terrain system.
Now...on to the pics:
This is a simple "how to" series of pics that shows each layer of the system.
Layer 1: The interlocking gray foam tiles in a 4'x4' square.

Layer 2: Hills paced on top.

Layer 3: Game mat placed on top.

Layer 4: Roads added.

After this, add scenic items as needed. The following photos show how the same system can be changed from one type of table layout to another simply by adding elements and moving things around a little bit.
The first series of photos shows a generic wilderness type table with a road going through it. The hills are covered in trees and the open areas with rocks and bushes and other kinds of growth. The forests here are dense with trees.


Now take the same table, remove the forests, put down some hedgerows and cultivated fields, add trees to the hedges, and you have a nice compact Normandy Bocage table.

Normandy Road Junction.

Looking from the other direction.

Small Normandy Apple Orchard. Probably making Calvados...

Orchard Gate.

A country lane in the Bocage.

Sleepy farm country.

Somewhere outside Caen.

Some useful tips should you decide to give this system a try:
You can do forest templates for dense forests with lots of trees and undergrowth, or you can do nice open areas of terrain with only a few sparse trees here and there and both will give a very natural look. It is also really easy to do tree lines without hedges simply by placing trees in a straight line between fields and putting a few random bushes along with them.
You can switch to an autumn or winter board simply by laying down a different game mat and/or using bare or evergreen trees. I am experimenting with some white birch trees to do games set on the Eastern Front in WWII or in North America during the F&I or AWI.


With this system you could potentially do sunken roads, dry riverbeds, or rivers by cutting these features into blue or pink foam or buying extra gray foam tiles and cutting them as needed. If you cut out the riverbed, lay down the game mat, and then place your river inside the sunken part it helps create the 3D effect that is so difficult to achieve on flat tables. I am just beginning to experiment with this and will post about it when I come up with something I am happy with. The tests so far have been promising.
And that's it. I hope this helped to describe the terrain system and show how easy it is.
Wednesday, May 4, 2011
Gods of War.
In Soviet Russia, Golem create YOU!
This is my first AAR for my blog. It is also only the second game of Weird War II I have ever played. The first was a throw together game at my friend Rob's last Saturday. We just put some models on the table and began tinkering with a scenario idea. I had my Pulp/WWWII warband of Kook's Partisans. He had some Germans and an AT-43 Red Blok Walker (OOP from Rackham) that filled in as a Weird War II Soviet walker. We just made it up as we went along. It was a great game. It also gave me an idea for an improved, less half assed scenario. This past Monday we gamed it out again at the game club, but this time with complete forces and actual objectives.
The Forces:
The Bielski Partisans:Tuvia and Alexander "Zus" Bielski
Three Partisans (2 Rifles, 1 DP-28 LMG)
Rabbi Abraham Isaac Kook and his Golem.
Here they are mugging for a group shot:

The SS Nasties:
SS-Untersturmführer Hans Kartoffelkopf and SS-Unterscharführer Tropfenhosen
Five SS Tough guys (4 rifles, 1 MG-42 LMG)
Four Trucks (yes, trucks)
One secret cargo bound for Poland...
Due to the sheer evil of these guys, no photographs of them came out when developed (actually, we just didn't get a photo of them).
The Soviets:
Lt. головка металла and Sgt. Утюг Иван
Five "Die for the Motherland" Red Army soldiers (4 rifles, 1 DP-28 LMG)
One T-34/76
One God of War (Бог войны) 7k Walker Armored Suit (with Dshk HMG and twin rocket launcher)
We uh, also forgot to take pics of these guys as well.
The Scenario:
Tuvia and his band of Partisans had just ambushed and were ready to loot a lone German transport truck when all of a sudden...a new convoy of German trucks appeared around the corner and were heading right for them! Before they even had a chance to take up positions to ambush this new convoy, out of nowhere a T-34 tank festooned with Soviet soldiers comes crashing through the bushes to their left. At the same time, at remarkable speed, the German convoy rushes towards them and disgorges a horde of angry SS men...
"What the hell is going on?" Tuvia yelled to his brother Zus next to him, receiving a scolding glare from Kook. "Sorry Rabbi..."
"There's the convoy comrades! Attack! They have the 7k! Forward for the Motherland!" yelled Lt. головка металла to his soldiers.
"Achtung! Bolshevik schweinhunds! They must not stop us from getting through! They are after our shipment. It must not fall back into their hands! Angriff! For the Fatherland!"
"7k? Shipment? What are these guys talking about?" Zus barked while bolting his rifle and taking aim at the lead German soldier at the front of the truck...

Objectives: The Nazis are attempting to drive their convoy off the opposite table edge to allow them to get their secret captured cargo to a train in Poland bound for Berlin. But first they have to stop at a telegraph office and relay a secret message to a secret bunker in a secret factory in Berlin. The Germans like to keep a lot of secrets. The Soviets are a special detachment of NKVD security tasked with tracking down, stopping the Nazi convoy, and retrieving the Nazi special cargo. They are also under orders to destroy any one who stands in the way of their mission. The Partisans...well, they are there to loot the convoy for supplies, survive the onslaught of the arrival of the SS, and those Soviets that just arrived don't look like the friendliest bunch of comrades.
The table: A nice sunny day in Belarus...

A telegraph office on the right (with their very own vegetable garden!). A garage on the left side across the street. The crashed Opel Blitz and Bessie the cow in the middle. And a string of telegraph poles running down the road. Each of these features are the various victory locations for the game. We used the Where Heroes Dare! rules and each force was created using the Where Heroes Dare! Dossier PDF tool.
The Dare Locations and their effect in the game:
 Bessie and the Opel: A box filled with Molotov Cocktails. (Easy Dare)
The Telegraph Line: If the Partisans or Soviets, the line is either cut to prevent the Nazis from sending their message, or if the Nazis, the line is repaired (after having a second Dare check). (Easy Dare)
The Garage: If the Nazis, a Panzer IV G tank. If the Partisans or Soviets, a crate of Panzerfausts (none of those peasants knows how to drive a German tank, much less fire the gun. Too many moving parts). (Medium Dare)
The Telegraph Office: If the Germans, they are able to send their message (but only if the line is repaired). If they attempt this Dare without having found the Telegraph Line Dare, they find the line not working and must fix it before sending the message. If the Partisans or Soviets, they may send for a reinforcement of a 7k. (Medium Dare)
They say the first casualty of war is innocence. Bessie would beg to differ.

This was one of the objectives, the scene of the Partisans original ambush on a German truck that went horribly wrong. For the cow. Some Partisans will be eating well tonight. Though I'm not sure beef hit by Opel Blitz truck counts as Kosher.
The Game: Each player rolled his initiative at the start of the turn. The lowest initiative went first, followed by the next highest, and then the highest. Ties were rerolled.
Things started badly for the Nazis. Their truck got hit by the T-34 and almost blew up, scattering the passengers onto the road.

The Soviets moved towards the telegraph office while the LMG took pot shots at the Partisans. This came as a surprise to the Partisans (though how surprising is it really?).

The Partisans took up positions in the woods and field and returned fire at the Soviets while Kook and the Golem moved towards the garage.

The Nazis tried to move up more trucks and get their men into position while the SS leader took matters into his own hands and ran towards the first Dare location (the telegraph line). He solved the Dare and realized that the line was cut and so must wait until next turn to fix it. The Soviets moved into position in the telegraph office and began to pour fire into everything near them while the T-34 loitered around trying to find the fleeting targets of the madly scrambling for cover SS. The Soviet 7k began to wander around behind the telegraph office doing...well...nothing really.

Next, Kook managed to find a crate of Panzerfausts under a tarp in the garage. "What are these tube things?" The Golem just stared blankly at him. Somehow, the idea of a Rabbi Kabbalah Mystic wielding a Panzerfaust just sounds like a recipe for trouble. Or fun.
Meanwhile, as the SS advanced on the telegraph office and began to take casualties, the fun really began when the SS secret cargo was revealed to be none other than a captured 7k Walker Armored Suit! Seeing this metal menace approach, Kook sent his trusty Golem to attack the armored behemoth. The titans clashed in the street as a huge melee ensued inside the telegraph office (subsequently dubbed the house of death) between the Soviets and the SS .

A very important lesson was learned this day: do NOT bring a golem to a robot fight.

The Golem went down, and went down hard.
(We used the Big Robot rules from the Where Heroes Dare! book and I used the regular Companion rules to create the Golem and give him Schticks to match).
Kook tried at least twice to fire a Panzerfaust rocket at the captured German 7k only to miss. What can we say? The guy is a Rabbi trained in the mystical arts of Kabbalah who uses a Golem to fight...so cut him some slack for bad shooting. It must be the glasses. After realizing that these Panzerfausts are probably better off in the hands of one of his Partisan friends, Kook dashed for cover.
In the chaos of the fighting for the telegraph office, the Soviet 7k finally managed to recover from a drunken Vodka stupor and ambush the captured German 7k from behind. After putting a rocket round into it's back, the damaged 7k stumbles backwards and falls into a heap of burning scrap. Zus discovers the box of Molotov Cocktails in the back of the crashed Opel truck only to realize that the captured German 7k is already burning.
Strewn with corpses and a burning 7k, the battlefield begins to quiet. The SS are all dead, the Partisans are pulling back and away from the fight, and the Soviets are the only ones who can claim to have achieved 2 out of their 3 objectives.
It was a very fun game. Everyone got to see a robot take on a Golem and some SS were killed, which is always a fun time.
Thanks to the guys who humored me with the scenario.
Nazis: Rob
Partisans: Dieter
Soviets: Mike "Woody"
Dieter took all of the pics with his new fancy schmancy notebook thing. Thanks again!
*Dieter came up with the line about the innocence of war and killing cows.
Also, no cows were harmed in the making of this AAR.
This is my first AAR for my blog. It is also only the second game of Weird War II I have ever played. The first was a throw together game at my friend Rob's last Saturday. We just put some models on the table and began tinkering with a scenario idea. I had my Pulp/WWWII warband of Kook's Partisans. He had some Germans and an AT-43 Red Blok Walker (OOP from Rackham) that filled in as a Weird War II Soviet walker. We just made it up as we went along. It was a great game. It also gave me an idea for an improved, less half assed scenario. This past Monday we gamed it out again at the game club, but this time with complete forces and actual objectives.
The Forces:
The Bielski Partisans:Tuvia and Alexander "Zus" Bielski
Three Partisans (2 Rifles, 1 DP-28 LMG)
Rabbi Abraham Isaac Kook and his Golem.
Here they are mugging for a group shot:

The SS Nasties:
SS-Untersturmführer Hans Kartoffelkopf and SS-Unterscharführer Tropfenhosen
Five SS Tough guys (4 rifles, 1 MG-42 LMG)
Four Trucks (yes, trucks)
One secret cargo bound for Poland...
Due to the sheer evil of these guys, no photographs of them came out when developed (actually, we just didn't get a photo of them).
The Soviets:
Lt. головка металла and Sgt. Утюг Иван
Five "Die for the Motherland" Red Army soldiers (4 rifles, 1 DP-28 LMG)
One T-34/76
One God of War (Бог войны) 7k Walker Armored Suit (with Dshk HMG and twin rocket launcher)
We uh, also forgot to take pics of these guys as well.
The Scenario:
Tuvia and his band of Partisans had just ambushed and were ready to loot a lone German transport truck when all of a sudden...a new convoy of German trucks appeared around the corner and were heading right for them! Before they even had a chance to take up positions to ambush this new convoy, out of nowhere a T-34 tank festooned with Soviet soldiers comes crashing through the bushes to their left. At the same time, at remarkable speed, the German convoy rushes towards them and disgorges a horde of angry SS men...
"What the hell is going on?" Tuvia yelled to his brother Zus next to him, receiving a scolding glare from Kook. "Sorry Rabbi..."
"There's the convoy comrades! Attack! They have the 7k! Forward for the Motherland!" yelled Lt. головка металла to his soldiers.
"Achtung! Bolshevik schweinhunds! They must not stop us from getting through! They are after our shipment. It must not fall back into their hands! Angriff! For the Fatherland!"
"7k? Shipment? What are these guys talking about?" Zus barked while bolting his rifle and taking aim at the lead German soldier at the front of the truck...

Objectives: The Nazis are attempting to drive their convoy off the opposite table edge to allow them to get their secret captured cargo to a train in Poland bound for Berlin. But first they have to stop at a telegraph office and relay a secret message to a secret bunker in a secret factory in Berlin. The Germans like to keep a lot of secrets. The Soviets are a special detachment of NKVD security tasked with tracking down, stopping the Nazi convoy, and retrieving the Nazi special cargo. They are also under orders to destroy any one who stands in the way of their mission. The Partisans...well, they are there to loot the convoy for supplies, survive the onslaught of the arrival of the SS, and those Soviets that just arrived don't look like the friendliest bunch of comrades.
The table: A nice sunny day in Belarus...

A telegraph office on the right (with their very own vegetable garden!). A garage on the left side across the street. The crashed Opel Blitz and Bessie the cow in the middle. And a string of telegraph poles running down the road. Each of these features are the various victory locations for the game. We used the Where Heroes Dare! rules and each force was created using the Where Heroes Dare! Dossier PDF tool.
The Dare Locations and their effect in the game:
 Bessie and the Opel: A box filled with Molotov Cocktails. (Easy Dare)
The Telegraph Line: If the Partisans or Soviets, the line is either cut to prevent the Nazis from sending their message, or if the Nazis, the line is repaired (after having a second Dare check). (Easy Dare)
The Garage: If the Nazis, a Panzer IV G tank. If the Partisans or Soviets, a crate of Panzerfausts (none of those peasants knows how to drive a German tank, much less fire the gun. Too many moving parts). (Medium Dare)
The Telegraph Office: If the Germans, they are able to send their message (but only if the line is repaired). If they attempt this Dare without having found the Telegraph Line Dare, they find the line not working and must fix it before sending the message. If the Partisans or Soviets, they may send for a reinforcement of a 7k. (Medium Dare)
They say the first casualty of war is innocence. Bessie would beg to differ.

This was one of the objectives, the scene of the Partisans original ambush on a German truck that went horribly wrong. For the cow. Some Partisans will be eating well tonight. Though I'm not sure beef hit by Opel Blitz truck counts as Kosher.
The Game: Each player rolled his initiative at the start of the turn. The lowest initiative went first, followed by the next highest, and then the highest. Ties were rerolled.
Things started badly for the Nazis. Their truck got hit by the T-34 and almost blew up, scattering the passengers onto the road.

The Soviets moved towards the telegraph office while the LMG took pot shots at the Partisans. This came as a surprise to the Partisans (though how surprising is it really?).

The Partisans took up positions in the woods and field and returned fire at the Soviets while Kook and the Golem moved towards the garage.

The Nazis tried to move up more trucks and get their men into position while the SS leader took matters into his own hands and ran towards the first Dare location (the telegraph line). He solved the Dare and realized that the line was cut and so must wait until next turn to fix it. The Soviets moved into position in the telegraph office and began to pour fire into everything near them while the T-34 loitered around trying to find the fleeting targets of the madly scrambling for cover SS. The Soviet 7k began to wander around behind the telegraph office doing...well...nothing really.

Next, Kook managed to find a crate of Panzerfausts under a tarp in the garage. "What are these tube things?" The Golem just stared blankly at him. Somehow, the idea of a Rabbi Kabbalah Mystic wielding a Panzerfaust just sounds like a recipe for trouble. Or fun.
Meanwhile, as the SS advanced on the telegraph office and began to take casualties, the fun really began when the SS secret cargo was revealed to be none other than a captured 7k Walker Armored Suit! Seeing this metal menace approach, Kook sent his trusty Golem to attack the armored behemoth. The titans clashed in the street as a huge melee ensued inside the telegraph office (subsequently dubbed the house of death) between the Soviets and the SS .

A very important lesson was learned this day: do NOT bring a golem to a robot fight.

The Golem went down, and went down hard.
(We used the Big Robot rules from the Where Heroes Dare! book and I used the regular Companion rules to create the Golem and give him Schticks to match).
Kook tried at least twice to fire a Panzerfaust rocket at the captured German 7k only to miss. What can we say? The guy is a Rabbi trained in the mystical arts of Kabbalah who uses a Golem to fight...so cut him some slack for bad shooting. It must be the glasses. After realizing that these Panzerfausts are probably better off in the hands of one of his Partisan friends, Kook dashed for cover.
In the chaos of the fighting for the telegraph office, the Soviet 7k finally managed to recover from a drunken Vodka stupor and ambush the captured German 7k from behind. After putting a rocket round into it's back, the damaged 7k stumbles backwards and falls into a heap of burning scrap. Zus discovers the box of Molotov Cocktails in the back of the crashed Opel truck only to realize that the captured German 7k is already burning.
Strewn with corpses and a burning 7k, the battlefield begins to quiet. The SS are all dead, the Partisans are pulling back and away from the fight, and the Soviets are the only ones who can claim to have achieved 2 out of their 3 objectives.
It was a very fun game. Everyone got to see a robot take on a Golem and some SS were killed, which is always a fun time.
Thanks to the guys who humored me with the scenario.
Nazis: Rob
Partisans: Dieter
Soviets: Mike "Woody"
Dieter took all of the pics with his new fancy schmancy notebook thing. Thanks again!
*Dieter came up with the line about the innocence of war and killing cows.
Also, no cows were harmed in the making of this AAR.
Saturday, April 23, 2011
Normandy Farmhouse Painted.
Hello there and welcome back to another episode of this old Scratchbuilt House. This project started a long time ago and was completely scrapped at least once. That is, I built the original house and after several attempts at trying to make it with stackable floors, then gluing it back together, the whole thing began to fall apart. So I started again and completed it by applying the things I had learned on the first attempt. Then it sat for a while on my desk because I had other projects going on or was just making excuses not to paint it because I knew it was going to be a pain the ass to paint. Lots of windows and doors and details like the spouting were going to take more careful painting then I looked forward to.
When I finally started painting it I quickly realized I lacked the kinds of brushes that would really help me paint this efficiently and accurately without having to do too many touch ups. So I picked up a nice variety pack of flat brushes (both bristle and sable) and these really helped. They were also cheap because when you paint scenery it is really hard on the brushes. For $4.95 for the pack I had the brushes I needed but could stand to abuse.
Here it is with the painting completed, or at least mostly. There are some touch ups to do, and I haven't decided if I want to do detailed interiors just yet, so for now it is just hollow with a lift off roof and lift out second floor. I'm thinking of temporarily printing out a floor layout and laying it inside. Also, I haven't added any ivy on the outside like you see on old French buildings like this. I might use ivy to cover up some of the seams on the foamcore you see in my construction work. I should have taken more time to hide those joins better. I'll do that on the next project.
The Front of the Farmhouse:

The back of the Farmhouse:

Front Door Detail:

Chimney with exposed stonework:

Rain spout (I learned alot about doing these I hope to apply later. The tricky part was getting the spouting and the roof to line up. You really have to plan ahead.):

Farmhouse with 28mm Miniatures showing the actual footprint of the building (Miniatures are converted half squad of Battle Honors EW Germans):

Summer Kitchen:

Lift off roof and removable second floor:

Hope you enjoyed.
To finish this Farmhouse project off, I plan to paint the set of walls I built to go with it and which attach to the garage/barn I had built earlier. This will complete the farmhouse complex, after which I want to start building the first of a set of French Village houses and shops.
When I finally started painting it I quickly realized I lacked the kinds of brushes that would really help me paint this efficiently and accurately without having to do too many touch ups. So I picked up a nice variety pack of flat brushes (both bristle and sable) and these really helped. They were also cheap because when you paint scenery it is really hard on the brushes. For $4.95 for the pack I had the brushes I needed but could stand to abuse.
Here it is with the painting completed, or at least mostly. There are some touch ups to do, and I haven't decided if I want to do detailed interiors just yet, so for now it is just hollow with a lift off roof and lift out second floor. I'm thinking of temporarily printing out a floor layout and laying it inside. Also, I haven't added any ivy on the outside like you see on old French buildings like this. I might use ivy to cover up some of the seams on the foamcore you see in my construction work. I should have taken more time to hide those joins better. I'll do that on the next project.
The Front of the Farmhouse:

The back of the Farmhouse:

Front Door Detail:

Chimney with exposed stonework:

Rain spout (I learned alot about doing these I hope to apply later. The tricky part was getting the spouting and the roof to line up. You really have to plan ahead.):

Farmhouse with 28mm Miniatures showing the actual footprint of the building (Miniatures are converted half squad of Battle Honors EW Germans):

Summer Kitchen:

Lift off roof and removable second floor:

Hope you enjoyed.
To finish this Farmhouse project off, I plan to paint the set of walls I built to go with it and which attach to the garage/barn I had built earlier. This will complete the farmhouse complex, after which I want to start building the first of a set of French Village houses and shops.
Sunday, April 10, 2011
Making Modular Forests.
File Under: Why didn't I think of this a few years ago...
I claim no credit for this idea...it was blatantly ripped off of this fine fellow's game table ideas. The Flickr photo tutorial gives a good idea of the technique.
Here.
Here.
I applied the basic idea of pinning things into interlocking foam tiles to trees only.
For years now I have been using the old wargaming standard single based trees placed on top of felt templates to create quick and modular forests. They were fast to set up, allowed trees to be moved around to accommodate miniatures, looked ok, yet still packed up easily into a box.
This did the job well enough for me for a long time. The trees looked decent enough. But the felt never looked like anything more than a bit of felt slapped on the table. Still, single basing trees was a pain in the butt and the base often took up a lot of room that limited where they could be placed.
I have considered various ways of doing trees that stand up well while taking up less space around the base. The problem is one of simple physics...a small base means the trees fall over easily. One idea would have been to take rare earth magnets in the tree trunks and stick them to sheet metal or sheet magnets under the game mat. But rare earth magnets aren't super cheap and I wouldn't be able to do contours like I could with the felt mats and based trees.
Then I saw the link above and thought it would be perfect for my purposes. I went to Lowes and grabbed two packs of gray 4'x4' interlocking foam tiles. This would allow the table to be easily put together, broken down, and then stored for trips to the game club. They come in a pack of four 2'x2' tiles that allows you to create a 4'x4' tile. They also come with an edge piece so you don't have the jigsaw sides sticking out.
I already use a variety of game mats, including Games Workshop's flexible grass mat (these things are awesome), and a short hair teddy bear fur mat spray painted with Design Master floral spray (Basil color) for a taller grass look. The spray fades a little when applied and blends well with the fur for a nice varied look.
For this modular forest technique, all you do is set down the interlocked foam tiles and then lay your grass mat over top like normal (add hills as needed).
Here are the foam tiles with the mat on top:

However, this project does require some work on the trees. The one thing that initially gave me pause about doing this was the thought of taking all of my trees with bases and then ripping the base off and drilling a hole to allow a sharp needles to be inserted into the trunk. Basing the trees initially was a pain in the butt and a lot of work. I didn't want to end up with a box full of trees with sharp needles sticking out and running the risk of not liking the idea or finding that it didn't work, only to have to do the basing all over again...
So I tested it on a few trees.
It worked great. The only real downside is the fact that now I have a box full of sharp objects. I worked around this by putting a base of double thick foam core in a box and then sticking the trees into that standing up. Maybe I should get a sharps box from the hospital...Hopefully no one ends up with puncture wounds. Though it is only a matter of time before I might regret the whole thing, knowing my luck.
Here is a finished tree ready to stick into the table or someone's hand:

Now...on to the forests! For the old boring green felt, I decided they needed some variety and texture. I also wanted to add some foliage and shrubbery around the edges to give my forests a more realistic appearance. So I took the felt piece, spray painted the center out to the edge with dark brown Krylon Camo flat spray paint (leaving a little edge of green), followed by a healthy spraying of dark brown textured spray paint. The neat happy accident was that the spray paint clung to the fiber of the felt and created what looks like small branches and twigs littering the forest floor. After gluing on some small shrubs and bushes around the edge using Woodland Scenics Foliage Clusters, they were done, ready to be slapped on the game table and trees pinned in place.
Here are the results for what I felt was an easy and fast technique.

Now with trees pinned in place and shrubs added.

They can probably be fancied up a little with some grass clumps or static grass here and there, but they are basically done. It was a very easy project to do overall.
One of the bonus benefits of taking the trees off their old bases was that they snapped off clean. This allowed me to reuse them for basing up some shrubs, small trees, and bushes to be scattered either on the forest base to fill it out and make it more dense or just to scatter around the table to break up open areas of terrain.
After testing out some placement on the table, I put down a felt road (also sprayed with textured spray paint) and added some trees along the edge. I kept thinking of this photo:

So I went and grabbed my 1/56th Char b1 from AGNM and took some shots of a little scene to see how the whole thing came together.
First the table with raised road section under the game mat with new trees pinned in place:


Here are a few shots with the Char:


So that's it. Overall, I am very happy with the result. I think that, despite risk of injury, this will prove to be a really versatile and modular set of scenery. I really like the way the tree trunks go right into the ground. They stand up well, can be moved easily, and can even be used on inclines (I use well sloped sanded foam hills under my game mat).
Maybe I need to make a waiver for people to sign when they use these trees...
I claim no credit for this idea...it was blatantly ripped off of this fine fellow's game table ideas. The Flickr photo tutorial gives a good idea of the technique.
Here.
Here.
I applied the basic idea of pinning things into interlocking foam tiles to trees only.
For years now I have been using the old wargaming standard single based trees placed on top of felt templates to create quick and modular forests. They were fast to set up, allowed trees to be moved around to accommodate miniatures, looked ok, yet still packed up easily into a box.
This did the job well enough for me for a long time. The trees looked decent enough. But the felt never looked like anything more than a bit of felt slapped on the table. Still, single basing trees was a pain in the butt and the base often took up a lot of room that limited where they could be placed.
I have considered various ways of doing trees that stand up well while taking up less space around the base. The problem is one of simple physics...a small base means the trees fall over easily. One idea would have been to take rare earth magnets in the tree trunks and stick them to sheet metal or sheet magnets under the game mat. But rare earth magnets aren't super cheap and I wouldn't be able to do contours like I could with the felt mats and based trees.
Then I saw the link above and thought it would be perfect for my purposes. I went to Lowes and grabbed two packs of gray 4'x4' interlocking foam tiles. This would allow the table to be easily put together, broken down, and then stored for trips to the game club. They come in a pack of four 2'x2' tiles that allows you to create a 4'x4' tile. They also come with an edge piece so you don't have the jigsaw sides sticking out.
I already use a variety of game mats, including Games Workshop's flexible grass mat (these things are awesome), and a short hair teddy bear fur mat spray painted with Design Master floral spray (Basil color) for a taller grass look. The spray fades a little when applied and blends well with the fur for a nice varied look.
For this modular forest technique, all you do is set down the interlocked foam tiles and then lay your grass mat over top like normal (add hills as needed).
Here are the foam tiles with the mat on top:

However, this project does require some work on the trees. The one thing that initially gave me pause about doing this was the thought of taking all of my trees with bases and then ripping the base off and drilling a hole to allow a sharp needles to be inserted into the trunk. Basing the trees initially was a pain in the butt and a lot of work. I didn't want to end up with a box full of trees with sharp needles sticking out and running the risk of not liking the idea or finding that it didn't work, only to have to do the basing all over again...
So I tested it on a few trees.
It worked great. The only real downside is the fact that now I have a box full of sharp objects. I worked around this by putting a base of double thick foam core in a box and then sticking the trees into that standing up. Maybe I should get a sharps box from the hospital...Hopefully no one ends up with puncture wounds. Though it is only a matter of time before I might regret the whole thing, knowing my luck.
Here is a finished tree ready to stick into the table or someone's hand:

Now...on to the forests! For the old boring green felt, I decided they needed some variety and texture. I also wanted to add some foliage and shrubbery around the edges to give my forests a more realistic appearance. So I took the felt piece, spray painted the center out to the edge with dark brown Krylon Camo flat spray paint (leaving a little edge of green), followed by a healthy spraying of dark brown textured spray paint. The neat happy accident was that the spray paint clung to the fiber of the felt and created what looks like small branches and twigs littering the forest floor. After gluing on some small shrubs and bushes around the edge using Woodland Scenics Foliage Clusters, they were done, ready to be slapped on the game table and trees pinned in place.
Here are the results for what I felt was an easy and fast technique.

Now with trees pinned in place and shrubs added.

They can probably be fancied up a little with some grass clumps or static grass here and there, but they are basically done. It was a very easy project to do overall.
One of the bonus benefits of taking the trees off their old bases was that they snapped off clean. This allowed me to reuse them for basing up some shrubs, small trees, and bushes to be scattered either on the forest base to fill it out and make it more dense or just to scatter around the table to break up open areas of terrain.
After testing out some placement on the table, I put down a felt road (also sprayed with textured spray paint) and added some trees along the edge. I kept thinking of this photo:
So I went and grabbed my 1/56th Char b1 from AGNM and took some shots of a little scene to see how the whole thing came together.
First the table with raised road section under the game mat with new trees pinned in place:


Here are a few shots with the Char:


So that's it. Overall, I am very happy with the result. I think that, despite risk of injury, this will prove to be a really versatile and modular set of scenery. I really like the way the tree trunks go right into the ground. They stand up well, can be moved easily, and can even be used on inclines (I use well sloped sanded foam hills under my game mat).
Maybe I need to make a waiver for people to sign when they use these trees...
Subscribe to:
Posts (Atom)


