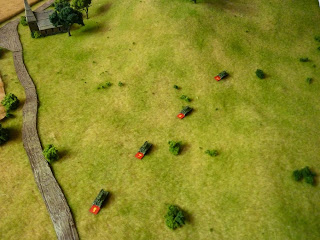
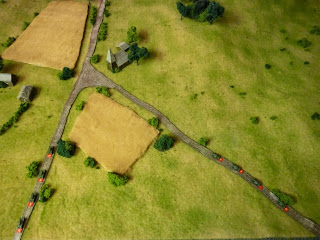
I decided to fight a small tank skirmish from this battle using my 6mm Panzer IIIs and Soviet T-26s. I wanted to pick a battle that had the Soviets on the offensive and the Germans slightly off balance. Reading through some of the opening battles of the Barbarossa Campaign, I came across reference to the Battle of Brody and decided it would be perfect.
The game turned out to be a massacre for the Soviets.
I used Disposable Heroes: Point Blank to fight this all tank micro armor game. Point Blank is great for those detailed tank engagements where each player controls a platoon of tanks. It allows for keeping track of ammunition, damage, crew losses, and other details.
The tanks are all 6mm (1/285th scale) from GHQ. I used a ground scale of 3"=25 yards.
Special Rules for Point Blank Tank Battles:
Tank Formations: Tanks can operate in formations, with a set range of distances between each tank. This distance is listed below and no tank can be further than the formation distance from another tank it the unit. Also, the tank formations start the game in either column, wedge, V, or Flank (left/right). Once the battle began, the platoons could move as necessary outside this initial formation shape as long as they maintained the proper formation distance during the rest of the game. The roll for initiative at the beginning of the game also determined which formation a platoon would start the game.
German tank formations (Command Distance) could be anywhere from 3" out to 15" (25-125 yards). The German tanks had radios, could use more open formations, and did not have to be within LOS to act as long as they were within Command Distance.
Soviet tank formations (Command Distance) could be anywhere from 3" out to 9" (25-75 yards). Soviet tanks did not have radios at the platoon level, so they used flag signals. They could also not operate out of LOS of their platoon leader. Any Soviet tank that found itself out of LOS of its platoon leader had to take a Skill Check (Difficult -4) to use Action Points.
I allowed all tanks to share Action Points during an Activation as long as they were within formation. Also, if a unit was moving in column, as long as no tank in the platoon attempted to acquire a target, did not fire, reload, or take any other action, the whole platoon could move up to the column leader's fast speed with the lead tank moving no further than the fast speed and the rest of the tanks in the platoon in a line behind. This allowed for a reserve move (especially down roads), but could pose a danger if the enemy was nearby to exploit the bunching rules in Point Blank.
Lastly, I used the Ammunition Ready Rack rules and gave each tank a select number of rounds in their ready racks ready to go. Any tank that ran out would have to reload their ready racks before being able to fire again.
The forces involved were as follows:
Germans:
Platoon of Panzer III F/G with 5cm gun. Ready Rack: 8 rounds.
Tank 111* (Platoon Leader)
Tank 112
Tank 113
Tank 114
Tank 115
 |
| Platoon of Panzer III F/Gs with 5cm gun |
The German crews had the following stats:
Accuracy: 5
Guts: 10 (Lt.), 9 (Sgt.), 8 (Crew)
T&E: +2 (Elite)
Activation Pool: 12
The Platoon Leader tank was commanded by the Lt., while the rest of the tanks were commanded by Sgt.s.
Soviets:
2 Platoons of Soviet T-26 1939. Ready Rack: 5 rounds.
Tank 1* (Platoon Leader)
Tank 2
Tank 3
Tank 4
Tank 5* (Platoon Leader)
Tank 6
Tank 7
Tank 8
 |
| Platoon of T-26 1939 |
The Soviet crews had the following stats:
Accuracy: 5
Guts: 8 (Lt.), 7 (Sgt.), 6 (Crew)
T&E: 0 (Trained)
Activation Pool: 8
The Platoon Leader tank was commanded by the Lt., while the rest of the tanks were commanded by Sgt.s.
 |
| The table. A farm outside the town of Dubno. Top is West |
The game began with a roll for Initiative. The winner of Initiative would be allowed to choose to go first or second, and would be allowed to set up anywhere on his side of the table within 10" and in any formation. The loser would be forced to deploy first and in column on a road on his side of the table within 10".
The Germans won the roll for Initiative. The Soviets deployed first, and the Germans decided to take the first Activation.
 |
| Soviet tank platoon in column. |
 |
| 2nd Soviet Platoon in column heading East from Dubno. |
Activation 1: Germans.
Tank 111 moves slow speed down the road to find the Soviet column in his view. The platoon leader tank Acquires the lead tank in the Soviet column, fires, and misses! The crew then reloads.
Activation 1: Soviets.
Tank 1 and 2 move forward at slow speed. Tank 1 Acquires German tank 111, fires, and hits the tank in the track. The round penetrates and damages the track, reducing the vehicle to slow speed for the rest of the game.
Activation 2: Germans.
Tank 111 moves slow speed right, fires at the same Soviet tank 1, and once again misses!
Activation 2: Soviets.
Tank 2 moves slow speed left next to the farmhouse. Tank 3 moves slow speed forward on the road.
Activation 3: Germans.
Tank 111 fires again at Soviet tank 1 and misses for a third time. Tank 114 moves up onto the nearby hill on the left and Acquires Soviet tank 3.
Activation 3: Soviets.
Tanks 5, 6, 7, and 8 all move fast speed in a column, going off road and swinging to the right and towards the hill.
 |
| Soviet column moves towards right hill. |
Activation 4: Germans.
Tank 111 reloads, fires again, and finally hits Soviet tank 1. The round penetrates and the tank is brewed up. Some of the crew survive, but they flee to the rear.
Tank 114 fires and hits Soviet tank 3. The round penetrates with a catastrophic result! The vehicle is destroyed and the entire crew is killed. Two tanks in one Activation!
The massacre has begun...
Activation 4: Soviets.
With their platoon leader dead, the rest of the Soviet platoon take a Guts check. Surprisingly, the platoon passes the Guts check and continue the fight!
Activation 5: Germans.
Tank 115 and 112 move fast speed onto the hill on the left flank.
Activation 5: Soviets.
Tank 5 and 6 move up slow and medium speed towards the hill on the right.
Activation 6: Germans.
Tank 115 moves up slow speed to the edge of the woods on top of the hill on the left. The crew Acquire Soviet tank 5. They fire and hit! The round penetrates the hull and the resulting explosion sends another fire plume towards the sky.
Activation 6: Soviets.
The loss of another platoon leader sends the second Soviet platoon into a panic. The platoon fails their Guts check and tank 6, 7, and 8 full reverse towards their table edge. On the other Soviet flank, tank 2 passes a Skill Check to Activate after the loss of his platoon leader and succeeds. Tank 2 then moves slow speed into a position to spot the enemy, but fails to Acquire German tank 114.
Activation 7: Germans.
Tank 114 Acquires Soviet tank 2, fires and misses. The crew reloads, fires again, and hits. This time, the round penetrates and another Soviet tank is brewed up!
Activation 7: Soviets.
After also passing a Skill check to Activate, tank 4 moves onto the hill on the right, taking up a position on the flank of German tank 112. The crew fails to Acquire their target.
Activation 8: Germans.
Tank 112 fails it's Acquisition roll to spot the flanking maneuver of Soviet tank 4, so the crew cannot react to this new threat. However, tank 115 moves medium speed across the low depression between the hills on the right and takes up a position on the hilltop within view of the Soviet platoon that was withdrawing from the battle. The crew Acquires Soviet tank 7. They fire, hit, and using their elite crew skill, move their hit result from a track hit to a hull hit. The round penetrates and once more, a Soviet tank bursts into flames!
Tank 4 now Acquires German tank 112. The crew fires, hits, and penetrates with a major damage result to the track. The Soviet crew decides to reload and fire again to make sure their target is destroyed. This time, the round hits, penetrates, and causes a catastrophic internal explosion! The Soviets have gotten their first, and only kill of the battle. This is also the last Activation from their Activation Pool for the Soviets this turn. From here on out, the Germans can Activate the rest of the Activations from their pool.
German Activation 9-12:
It's pretty much over for the Soviets. The Germans maneuver a few more of the tanks in their platoon into firing positions or towards the objective. Tank 115 moves into a position to Acquire, fire at, and knock out Soviet tank 8. At the end of the German Activations, the game is called.
 |
| The Germans advance on Dubno farm. |
 |
| German positions at game end. |
Results:
What a massacre!
Soviet Losses:
Tank 1* Platoon Leader
Tank 2
Tank 3
Tank 5* Platoon Leader
Tank 7
Tank 8
Massive losses, and all but one tank was a catastrophic explosion of the vehicle and the death of the crew.
German Losses:
Tank 112
Tank 111 damaged
The Germans clearly won a major victory here. The Soviets not only lost the Initiative to start the game, but the German gunnery was excellent. Other than the German platoon leaders first few shots, the Germans hit and penetrated everything they shot at. Their 5cm guns sliced through the T-26 likes a hot knife through butter. The only bright spot for the Soviets was the T-26 that was able to sneak onto the flank of 112 and get two nice solid flank shots. The Germans were surprised by the move, but they were otherwise in too powerful a position by the end of the turn for it to make a difference.
There you have it! A single turn of Disposable Heroes: Point Blank as an all tank skirmish using micro armor. Games of Point Blank move fast and the action is furious. This battle ended up pretty one sided. The Soviets just couldn't seem to stand up against that expert German gunnery in this game. Still, they were not completely incompetent. Despite the loss of their platoon leaders, at least a few of their tanks attempted to maneuver and engage. Sometimes, that's just the way combat goes.
I love the early war period, where even a 5cm gun can dominate the battlefield. If only the Soviets had brought along a few of their T-34s. Maybe next time they will when the Germans try to push on past Brody...
For now, the 16th Panzer Division rides forward in victory.


Lovely report. Thanks for sharing!
ReplyDeleteI'm curious how you did the flame markers. Do you have a tutorial to link to?
Glad you liked it, thanks!
ReplyDeleteI made the brewed up markers by taking a pin and pushing it through some clumps of Woodland Scenics clump.foliage. Then I spray painted it black, drybrushed the whole thing gray and white and then red and yellow at the bottom. Then you just stick the pin into the table next to the tank.