Sunday, January 17, 2010

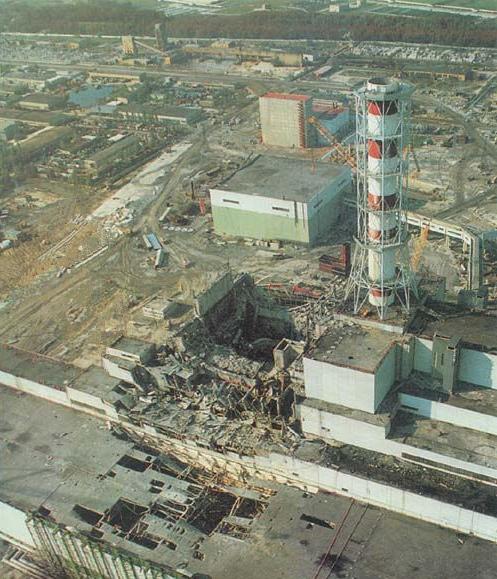
Pripyat.

A little diversion here, though continuing with the Soviet theme...

I was cleaning out a box of unfinished minis and found these 28mm Eureka 1980's NBC suit Soviets hiding in the back. I decided to finish them up and get them out of my backlog since they only needed a little work on weapons and packs to finish. Besides the NCO, Sniper with Dragunov, Specialist with Geiger Counter, and the LMG gunner with the PK, there are five grunts with AK-47s left to finish.


I picked these up a few years ago at one of the conventions with the intention of using them in a zombie outbreak containment game set in the city of Pripyat, Ukraine after the Chernobyl disaster. Eureka actually sells these and a set of zombies to go with them for just that purpose.

All I need yet are the zombies! I'll probably need a bunch of them though...

Saturday, January 16, 2010

Projects for the New Year.

As part of the cleaning and organizing of my painting desk, I figured I should also make a list of projects to complete in the coming year. I have a lot of projects to choose from, but I want to put together a list of priority projects and get some old and unfinished stuff out of the way.

Miniature Projects:
28mm Mid War Soviets. Battle Honors (complete).
28mm Soviets in NBC Suits. Eureka (complete).
15mm Polish 10th Motorized. True North Miniatures (complete).

28mm ACW Union Company. Old Glory.
28mm ACW Confederate Company. Old Glory.
15mm French. Old Glory/Command Decision.
15mm Soviet Rifle Company. Quality Castings.
28mm Battle of the Bulge US Airborne. Artizan Designs.
28mm Battle of the Bulge Germans LMG teams. Artizan Designs.
28mm Japanese Ni mortar squad, snipers, and AT teams. Brigade Games.

Scenery Projects:
More hills cut out and sanded.
Finish painting 28mm tree bases.
28mm Normandy Farmhouse Complex. Shed is almost painted.
15mm Eastern Front houses scratchbuilt.
28mm ACW fences and walls.
More 28mm Hedgerows.
28mm Railroad tracks.
More 15mm trees.
15mm Railroad tracks.

Iron Ivan Games Projects:
Point Blank: 1:1 scale Squad Level WWI-Modern Combat system.
Polish 10th Motorized scenarios.
"May Be Forever": Civil War mod of This Very Ground.
Fields of Battle: Panzer Lehr.

That's a good start. Now I need to stick to the plan and get a move on some of this stuff. It's been nice enough the past few days to get some minis primed...

Mid War Soviets.

Wow has it been a long time since I updated. The holidays have a tendency to sneak up on you and before you know it a new year is upon you.

I decided to start the year off right by cleaning my painting table from top to bottom and getting myself organized. I also started to work up a list of unfinished projects I wanted to get off the table and out of the way so I can start on the new projects I want to complete this year.

I have had several platoons on the table now for all of last year with just a squad or two unpainted. The first one to get out of the way is my Mid War Battle Honors 28mm Soviet Platoon. I had completed a command section and two squads for some time, but needed to finish off the third squad and the heavy weapons to make a viable platoon for the table top. That is now complete.

Here is the result. I used a new filter on my free editing software that gives it a grainy war time photo look. Not sure if I like the result or not yet...


I am also experimenting with new photography techniques for miniatures. The biggest difference was learning to take better angles. Down low and in close has helped give me better results for taking pics of minis. I might need to go back and start retaking a lot of pics of my other miniature projects. That will have to wait for now though.

Here is one of the three rifle squads:


And the heavy weapons to support them:


I'm not happy with the pics of the Rifle Squad or Heavy Weapons, but I will have to take better photos later.

This makes a complete Mid War Soviet Rifle platoon with the bare bones of support.


I have two painted T-34 early models to go with them and a Zis-3 76mm AT Gun, but I need to get some crew and add snipers and maybe a 4th squad. I also have some SMG models to finish to turn this platoon into a Desant platoon which brings a lot of drunken firepower to bear. These go against my Battle Honors 28mm Waffen SS to allow me to do post Stalingrad through Operation Zitadel and perhaps even up to and beyond Operation Bagration games.

Hope you enjoy!

Monday, October 5, 2009

Normandy Farm Complex.

Hello all,

I just finished the construction of some of the new buildings to go with the barn I built earlier. These two buildings will go together to make a farm complex. It will also feature a gated wall to go around them which will come later.

As mentioned previously, the barn was my first attempt after a long hiatus of building terrain houses. For my next piece I decided to go all out and do a really detailed (inside and out) Manor House and shed for Normandy and Belgium. The barn was a test and I learned a lot of things I would put to good use (or avoid) for the next piece.

I started work on both buildings at the same time (I often do this to keep my interest going). The main focus was the Main Farm Manor House which I intended to be rather large. The second building was to be an 'L' shaped shed with garage. The idea was to recreate this terrain piece from Sentry Models range of 20mm buildings, but in 28mm and more detailed:

Sentry Models Building

I also wanted to have lift off roofs which would be built with real framing techniques (I consulted my Brother in Law who does framing for this) as well as detailed floors and interiors.

The original roof of the barn in my previous post worked, but isn't done with real framing, so it will have to be rebuilt. This meant I was learning to do this new roof from scratch.

The construction has taken several weeks. The original plan was that each floor would be removable as a whole instead of just lift out floors, but they didn't seat well with the sides of the manor house with the chimneys. Other than that, everything went as planned and even the roof came out just like I wanted. The interior has yet to be done and there are some details to finish on the manor house (such as the rear stone cornices), but it is pretty much ready to paint.

I also came upon a good toybox find from my son's collection of cars. This die cast 1930s car missing a tire would turn out to be the perfect scale for 28mm gaming as well as the right period. I intend to paint it and use it for battlefield clutter. I am undecided if I want to paint it rusted and abandoned or new and just missing a tire (perfect for the garage of the shed).

Hope you enjoy!


Front view of house. The shutters are the louvered kind common to houses from the period. They are made with really small scale plastic sheet siding (N scale I believe) from Evergreen. I cut out a section and then added edges of basswood strips. Simple and effective.


Rear view of house. The windows aren't as fancy as the front and there is a small side outbuilding with a peaked roof.


Roof detail. I built the ends of the roof with foam core. Then I built a support beam between them and added supports connecting to the main roof beam to give the roof its peak. Across all of these I added the wooden slats to attach the roof sheets to. This is how a real roof is built, though mine probably has less supports and doesn't conform to housing regulations!


Shed with tin roof (rusted).


Rear of shed.


Shed interior detail.


Shed roof. Slightly more complicated than the other roof, but same concept. Both have a rim which slots perfectly into the building so they stay on when in use, yet still come off easily enough to allow models to be placed inside.


The toybox find. Josh won't miss it since it was missing a wheel anyway (on the other side). Besides, he's much more into trains, his bus, and his trucks...

Next I have to build the interior walls and rooms and paint the whole thing. The shed is ready to go and will get a nice rusted roof treatment.

Saturday, August 29, 2009

Hedgerows. Simple, fast, and nearly indestructible.

Hey folks,

The following is a little "how to" for making Normandy hedgerows (Bocage). These can be made as the smaller, typical hedgerow you could find alongside any field in NW Europe, all the way up to the high banked, tree lined kind typical of the Bocage region of Normandy. These allow for trees to be placed or removed depending on how you want them to look for any given game.

These will be 28mm Hedgerows, but the same idea can be used to make any scale really. You just have to buy the appropriate size wood.

Materials needed:

1" wide flat strip of Basswood in 2' length (I use Basswood, rather than Balsa as it is tougher and doesn't warp as easily). This is the base.

2' long piece of "leading edge of wing" balsa (see pic). These are used by model plane builders for the leading edge of the wing. I found they make perfect hedgerow embankments! They come in various sizes and heights.

X-acto knife.

Sand or preferred texture material (I use model Railroad stuff in fine grade).

Small rocks (I use aquarium rocks, which just happen to be pink).

Sandpaper.

Static grass.

Woodland Scenics Foliage Clusters (I am using Medium Green for this).

Flat black spray paint.

Paint: Dark Brown (GW Scorched Brown, Yellow Ochre (GW Vomit Brown), Gray (GW Codex Gray) and White (GW Skull White).

CA Glue (I use Zap-A-Gap, pretty much the best glue ever made).

Wood glue.


You can make these hedgerows as generic or detailed as you like. You can add sections of stone wall (I used pieces of wall from Armourcast's Terraform line of terrain), fences, gates, openings, sections where tanks have broken through, bunkers, pretty much anything you like. The following is how to make them generic suitable for any table.

1. Cut the strips of flat base material (the 1" wide strip of Basswood) and the leading edge Balsa into the desired length. For this one, I made the hedgerow 12" long. I have also made 2' long sections, and "T" sections with each piece 6" long.

I use CA glue to glue the hedge to the base.


2. Once cut to size and glued in place, I cut the top of the hedge flat and make irregular cuts all along the tops and sides of the hedge, as well as rounding off the ends to give it a more natural shape. I also make sure to cut the base edge that sticks out at an angle so it will blend in with the table better.


3. Once the rough cutting is done, I sand the whole thing smooth.

4. After sanding, you can begin gluing the small rocks in place. I glue the rocks along the side in areas where the hedge has natural dips or folds or even exposed sections as well as on the ends. You can even glue them the entire way along the sides, but I like a little less rocks on mine.

I use the CA glue for this and then fix the glue instantly with CA instant set spray (sometimes called Zip Kicker).


5. With the small rocks glued down, now it is time to add texture to the whole piece. I glue around the rocks with CA glue and add texture first...


Then cover the whole rest of the exposed areas with Wood Glue and cover with texture. Here are a few example pieces finished and ready for painting. This "T" piece has a small gate.


6. Spray paint flat black, then dry brush with Dark Brown followed by Yellow Ochre. Paint the rocks with Gray followed by a drybrush of White. I also drill holes at this point. These holes are for plugging in Woodland Scenics ready made trees, or any other kind of tree you may want to use.


7. Glue down clumps of foliage clusters using CA glue. I use this glue on this part because it means these foliage clusters will stay put. I also leave gaps around the holes. Then around the base edge, I add wood glue followed by static grass to blend the hedgerow into your table top. Here I use a similar color to GW flock because my gaming mat is GW, so the colors blend together well. Noch makes a summer blend that is very close but is MUCH cheaper.

I use medium green foliage clusters for the whole piece. It may look uniform, but I found from the pics I see of the hedges in Normandy, that the bushes along the top often look a similar shade of green, while the trees are of a larger variety of type and color. I leave the trees I plug into the hedgerows to add variety of color. You may find that you want to add variety of color by using different colors of foliage clusters. Visually, I found the differences to create a bit too chaotic a look in color variation. Maybe I just have boring taste in foliage.

Here is the completed hedgerow below.


8. Add any extra details you like. I also spray mine with a flat sealer.

Here is a shot looking down the hedgeline and a shot of the completed hedgerow piece on the table.


The best thing about using these materials is the hedgerows are virtually indestructible. Even the bushes are glued very solidly to the hedge. Using Woodland Scenics clump foliage means no flaking of flock off of the bushes or fragile hedges made from other material like styrofoam. The wood base and solid balsa hedge make these suckers TOUGH!

I can put these in a box and transport them without ever having to worry about them breaking. I have seen all kinds of hedgerow tutorials, and they are all made from relatively fragile materials or made in a way that with too much use or transport you will lose flock or suffer damage (except those made cast in resin). I make all my stuff tough because I game with my scenery at my club and at conventions and everything has to be easily transported. I hope you find this useful for quickly and easily making the toughest hedgerows around!

Tuesday, August 25, 2009

Your Barn Door is Open...


Hey there,

I recently started a whole new set of 28mm terrain pieces, specifically, a new collection of buildings for NW Europe. I have a large collection of 28mm buildings done by Armourcast from their medieval line that I used for years to sit in for WWII buildings, but they are too small, and do not have the right architecture for WWII. They work for a generic table, and for years I was just too lazy or committed to doing other terrain such as hills, woods, walls, etc. to concentrate on buildings. I used to scratchbuild all of my terrain, but found the allure of just buying a resin building and painting it to be high enough to negelct building more specific pieces I wanted.

This is my first go after years of not scratchbuilding so I was a little rusty. I plan on redoing the roof in more detail by doing the actual framing. I also plan to do extra destroyed roofs so I can swap them out. I might even do a "snow covered roof" so my barn can do double duty for a Bulge or Ost Front winter themed board.

The roof was tricky, and probably a little ambitious given how out of practice I have been working with basswood and foam core. I liked the end result and learned a lot for when I do the farm house and outbuildings.

I painted it with craft paints.

Hope you enjoy!