I just finished putting together and painting the first of my half dozen Sarissa Precision laser cut MDF buildings. I have been interested in these products for a while, but only recently decided to take the hit on shipping and currency conversion to get them from across the pond. I am really glad I did. These kits are amazing. I picked up the entire range of their 28mm WWII Normandy series. By buying one of each, I have myself a nice little French village.
I have never worked with MDF before, much less laser cut kits, so I wasn't sure what to expect. The material is nice to work with. You can cut it if you have to, you can sand it easily (though use a breath mask), and it glues well with regular old wood glue (though I also used some CA glue for some parts).
Straight out of the box, these kits are excellent. The kits go easily together and the laser cuts are precise. The kits overall are well planned and are pretty accurate architecturally for the period and region (at least to my amateur eyes). You could easily slap these together as is, spray paint them with a tan undercoat and finish off the details and you would have a great bunch of buildings. Being the kind of gamer I am, I couldn't resist using these as a blank slate for adding a ton of my own detail. I decided my buildings had to have plasticard shingled roofs, detailed chimneys, rain gutters and spouts, and custom shutters. I say this not to put down the original kits, but simply because building this kind of terrain is something I enjoy. The great thing about the kits is it saves me hours of headache measuring, cutting, and building my own. With the basic kit I just need to add the details, and since they are laser cut and so precise, adding details is easy, especially for adding the plastic sheet shingles to the roof.
Here is the kit straight out of the box from the Sarissa Precision website (I didn't get a shot of mine before I painted it). So far, I have 3 of the buildings built, and one of them painted with 3 more to finish. I also began working on some back yard walled gardens for the terraced houses.
Here are the shots of the completed version. I prefer a clean style to my buildings (except for ruins), and I use little to no drybrushing on most smooth surfaces. You could add your own interior walls if you liked. For now, I just painted the floors brown and brushed on some wood grain with a darker brown to save time.
If this building looks familiar, it's because I painted it to match my other 28mm building, the Normandy Farmhouse. I figure it could be paired with that building for a Norman farm complex.
Anyway, hope you enjoy!
More to come!
A wargaming, modeling, and miniature painting blog. These days focusing primarily on projects set in the Warhammer 40,000 universe, but not necessarily using those rules. Also the home of the Betrayal at Badab project, a rules mod for Horus Heresy: Betrayal at Calth
Sunday, February 5, 2012
Thursday, January 19, 2012
Battle of the Bulge Club Game.
Our game club, Army Group York (York Pennsylvania) played the following scenario on January 7th. The game was a platoon level game using the Disposable Heroes: Point Blank rules. Each player controlled a squad and/or platoon command and support assets. The following scenario is what was handed out to players before the game.
January 3rd, 1945, Neffe Belgium.
The great German surprise offensive has been stalled. After driving for the Meuse River and towards Antwerp, the Germans were stopped cold around the now famous town of Bastogne. Now that the "siege" has been lifted and the U.S. is back on the offensive, it falls to you to spearhead the attack or to hold onto ground already bled for. Despite running out of steam and never coming close to their objective of Antwerp, the Germans have still managed to launch a new offensive in Alsace and Lorraine (Operation Nordwind). While most of the German units in the immediate Bastogne area are short of men and supplies and are now on the defensive, they are still able to mount counterattacks and many of the units are experienced veterans. U.S. forces are tired and battered, but they are once again on the attack with clear weather and ample air support.
Historical Situation: (Meeting Engagement, U.S. slight defensive posture).
Neffe was one of the first towns the Germans captured on the way to Bastogne. American armored units from Team Cherry and some 101st Airborne engineers held out as long as possible, but eventually it was captured and they were driven back into Bastogne itself. The initial counterattacks out of Bastogne in January had been successful, but the situation was very fluid. Probes and attacks were met with counterattacks. On the way out of Bastogne, units of the 101st had captured Foy and several other towns on the northern shoulder of the city, but now it was time to start the drive East.
The Battle:
January 3rd: U.S. forces have sent in a forward platoon into the Western portion of the village and discovered it to be empty of Germans. However, the sound of engines can be heard from the East. The Americans will have little time to dig in and for the Germans it is a race to capture any vital ground possible to delay or hold the Americans.
Historical note: This is a semi-fictional scenario but is based on a known village (Neffe), and involves actual units operating in the area. I could not find reference to a specific action taking place in the town at this exact time, but the units are correct and the town layout is based on photos and maps of the area. The setting and time frame was chosen because I liked the look of the town, and I wanted to be able to have both sides on the attack. Plus, I think the post Offensive phase of the Bulge is a neglected gaming period. Both sides were tired, stretched thin, and were required to take part in a chaotic operational situation.
The Forces:
U.S. Airborne platoon of the 101st Division, 506th PIR. No support except possible reinforcement by unknown U.S. armored units.
Germans: Elements of 26th Volksgrenadier Division Division, Grenadier-Regiment 77. Supported by tanks of the 130th Panzer Regiment of the Panzer Lehr Division.
Objectives:
Both sides must consolidate their hold on the town by driving out enemy forces and capturing and cutting off routes of approach as well as taking as many tactically valuable locations as possible.
The Forces:
This game uses the rules system Disposable Heroes: Point Blank. In addition, we used some special rules for platoon sized games. These include rules for runners, ranging mortars and ammunition, as well as some of the special rules from Point Blank (add T&E to wound score).
The scenario also involved pre-game recon. Each platoon HQ player (Player 1) was allowed to make 3 recon attempts from a scout in each of his squads. We used the recon chart in the optional section of Disposable Heroes & Coffin for Seven Brothers (using the infantry entry). Failed recon rolls can mean the loss of the scout. Each scout may make multiple attempts to recon, but the chances of getting killed or captured go up (follow the rules for recon in DHC7B) except that instead of discovering hidden units there are different outcomes for each side:
For the U.S., recon attempts allow German units to be discovered and placed on the table before the U.S. deploys.
For the Germans, each of several locations on the German deployment side can be rolled for:
The Secondary Road
The Frozen Creek
The Trail
If a location is discovered, the Germans may bring troops onto the table at those locations within their deployment zone. If none of them are discovered, the Germans must come in on the main road and within 6" of either side.
Reinforcements: On turn three, the Germans may bring the third squad onto the table. The German platoon commander may make 2 last recon attempts to discover an entry location, or may use a location physically controlled by the German force. The U.S. Player may attempt to call for armored support by making a Skill Check (easy -1) by the radioman (considered specialist).
Each side is allowed one pre-game meeting to allow platoon commander's to give their initial orders and describe a battle plan. How they do this and what they decide is up to them, but their objectives are established by the scenario. This important because during the game, platoon commanders are not allowed to communicate instructions to their squads without sending runners. Runners can be sent to a squad. To do so, the player must measure to the squad leader he wishes to talk to, then he must measure the distance and spend the correct amount of Activations to send the runner (using the Command and Control rules from Point Blank). The runner is placed next to the squad leader for that Activation, and while there, the platoon commander may actually talk to the squad leader. After this Activation, the runner is automatically returned to the platoon HQ.
We also used rules for limited mortar ammo. The 60mm mortar squad arrives on the table with only 3 of each kind of round (smoke and HE). The mortar player must then send ammo bearers back to get more ammo during the game. This works by allowing an ammo bearer to go get ammo within a certain distance of the table edge during his Activation, and then return with 3 rounds. It is generally pretty easy to keep the tube supplied, but the ammo is not unlimited for the game.
The last special rules we used was ranging mortars. This allowed a mortar team to establish bonuses for firing on the same targets during the game. This was recorded on a special range card. This allowed the mortar team to dial in on a target and land more accurate rounds as the game went on...unless the target moved. Because the mortar team mostly fired smoke during the game and then got wiped out...this didn't seem to come into play!
Finally, we allowed platoon commanders to "give away" up to their T&E bonus in Activations to other players under their command at the beginning of each turn. This came in very handy at certain points in the game!
Once recon is complete, both sides rolled for Initiative. The winner decides whether his force deploys or the opponent.
The Game:
The pre-game recon went horribly for the Germans. And by horribly, I mean that there was not a single location successfully discovered AND all three scouts were lost.
The Germans also lost initiative to start.
The game began with the Germans piling their squads along the main road. Thankfully the U.S. were not in good positions to cover them with fire yet, so there was some room to shake out into better terrain.
The Germans began their assault by sending a rifle squad over a hill and towards a gully with the trail, where hopefully they would be able to stay out of sight of U.S. troops moving into town until close enough to assault.
Both Panzer IVs advanced down the road but turned off to the left side of the road and down into the depression towards the creek. There they tried to acquire U.S. units coming into town. With another round of bad rolling, they failed miserably to find their targets.
The Panzer IVs were being used by an infantry squad as cover as they advanced. The HMG team deployed along the road and began to pound away at U.S. infantry moving into town. This would prove to be one of the more effective units on the German side.
The U.S. quickly moved their troops into the town of Neffe and sent a squad towards the bridge. The push towards the bridge is assisted by the smoke from the 60mm mortars which put down a nicely targeted and dense smoke screen.
As the turns progressed, the Germans attempted to push over the hill and towards the town using the trail valley and the woods as cover. However, several U.S. riflemen in the two story building in Neffe pounded the German squad with heavy, accurate, and deadly Garand fire. The German squad leader went down followed by two more German riflemen. They had barely even had a chance to return fire. Had the advance been coordinated better, the German LMG team might have been better placed to put fire on the U.S. riflemen. As it was, the German rifle team went into action unsupported due to the timing and the lay of the terrain.
The German squad in the middle along the main road started to put pressure on the U.S. troops in the town, but also began to take casualties of its own.
Meanwhile, one of the Panzer IVs came to life and started blazing away at U.S. targets, first in the barn of the middle farm, then in the village. To deal with this armored threat, a U.S. bazooka team fired at the Panzer IV and knocked a track off, immobilizing it for the game.
The U.S. have been busy as well, bringing heavy rifle and LMG fire onto the German advance. By now, the third turn has arrived and the Germans managed to recon a new entry and then brought their third rifle squad onto the table as reserve. They would need it. The U.S. attempted to call for armored support, but could not get through. They tried again right away next turn and American Shermans arrived in the nick of time. However, before the U.S. players knew what happened, one of the Shermans was destroyed by the German Panzerschreck team. A duel between the remaining Sherman and the two Panzer IVs began.
On the right of the German side, a brave LMG gunner stepped out behind a wrecked U.S. ambulance and began blazing away at U.S. riflemen in the village. He is pinned by return fire, but not before he was able to cover the advance of a lone German riflemen who ran up to a building housing a U.S. bazooka team and put a grenade into the window. The blast killed the assistant and the gunner ducked out the back. German HMG and LMG fire has begun to have an affect on the U.S. troops in the town, but they are still in a solid position and the Germans are losing the steam needed to take the town.
On the German left, the recently arrived rifle squad tried to push towards the bridge only to be pushed back into the woods by the U.S. troops that had made it to the bridge under the smokescreen.
For some unknown reason, the U.S. moved up their 60mm mortar team to the farm in the middle. From here they were greeted by the immobilized Panzer IV with several HE rounds from the main gun and withering hull MG fire. The 60mm mortar squad is all but wiped out.
In the tank duel, the Panzer IV landed a killing blow on the second Sherman and sent the turret skyward in a ball of fire.
With the German advance checked on both sides, the battle starts to die down. The U.S. took some casualties but were able to hold the village (though their platoon HQ never set up a CP, but that was because of a miscommunication on my part in describing the U.S. objectives to the players). They did take and hold the bridge. The Germans were unable to kill enough U.S. troops, but they did destroy both Shermans. However, they failed to take any other objective.
The end of the game saw the U.S. in a better position than the Germans.
All in all, it was a very fun and intense game, with some very heroic moments as well as some tough fighting. The players generally didn't use the platoon runner communication rules.
Thanks to the guys at the club for playing. Chalfant, Tony, Greg, Dieter, Rob, and I had a good time. We could have used an extra 2 players, but made do with what we had.
I look forward to the next big platoon level game with Disposable Heroes: Point Blank. The rules play fast with each player controlling a squad, and with a large table, the ground scale looks pretty good in 28mm.
January 3rd, 1945, Neffe Belgium.
The great German surprise offensive has been stalled. After driving for the Meuse River and towards Antwerp, the Germans were stopped cold around the now famous town of Bastogne. Now that the "siege" has been lifted and the U.S. is back on the offensive, it falls to you to spearhead the attack or to hold onto ground already bled for. Despite running out of steam and never coming close to their objective of Antwerp, the Germans have still managed to launch a new offensive in Alsace and Lorraine (Operation Nordwind). While most of the German units in the immediate Bastogne area are short of men and supplies and are now on the defensive, they are still able to mount counterattacks and many of the units are experienced veterans. U.S. forces are tired and battered, but they are once again on the attack with clear weather and ample air support.
Historical Situation: (Meeting Engagement, U.S. slight defensive posture).
Neffe was one of the first towns the Germans captured on the way to Bastogne. American armored units from Team Cherry and some 101st Airborne engineers held out as long as possible, but eventually it was captured and they were driven back into Bastogne itself. The initial counterattacks out of Bastogne in January had been successful, but the situation was very fluid. Probes and attacks were met with counterattacks. On the way out of Bastogne, units of the 101st had captured Foy and several other towns on the northern shoulder of the city, but now it was time to start the drive East.
The Battle:
January 3rd: U.S. forces have sent in a forward platoon into the Western portion of the village and discovered it to be empty of Germans. However, the sound of engines can be heard from the East. The Americans will have little time to dig in and for the Germans it is a race to capture any vital ground possible to delay or hold the Americans.
Historical note: This is a semi-fictional scenario but is based on a known village (Neffe), and involves actual units operating in the area. I could not find reference to a specific action taking place in the town at this exact time, but the units are correct and the town layout is based on photos and maps of the area. The setting and time frame was chosen because I liked the look of the town, and I wanted to be able to have both sides on the attack. Plus, I think the post Offensive phase of the Bulge is a neglected gaming period. Both sides were tired, stretched thin, and were required to take part in a chaotic operational situation.
The Forces:
U.S. Airborne platoon of the 101st Division, 506th PIR. No support except possible reinforcement by unknown U.S. armored units.
Germans: Elements of 26th Volksgrenadier Division Division, Grenadier-Regiment 77. Supported by tanks of the 130th Panzer Regiment of the Panzer Lehr Division.
Objectives:
Both sides must consolidate their hold on the town by driving out enemy forces and capturing and cutting off routes of approach as well as taking as many tactically valuable locations as possible.
U.S. Airborne Briefing
Lieutenant,
We are on the move. Fritz has put his head in a noose by attacking into the Ardennes Forest. Now it is up to us to hang him. Your platoon is the vanguard of our counteroffensive designed to hurl his forces back on all fronts. We have reports that a new German offensive has opened in the Alsace and Lorraine region, but it appears to be a bit of last minute desperation. Regardless, it does not change our objective here.
The Germans have left a minimal blocking force around Bastogne as they attempt to withdraw. We are pushing on Foy, Noville, and Bizory, but we must now begin to push East. Your objective is the village of Neffe. German counterattacks are possible, but we expect minimal opposition by tired and dispirited enemy troops.
There is only one main road into Neffe, and it has a view of the valley beyond, but there are several large hills facing the town the enemy could use to spot for harassing artillery. Those hills and any roads or exit points beyond the main village must be taken. Establish a platoon CP within the village as a base for further advances. There should be at least a few buildings standing that will provide some good cover and observation. Keep an eye on the stream and some of the trails leading off the main road as it might offer a covered approach to the enemy. We can expect no air cover for this push as all of our air groups are shooting down the Luftwaffe somewhere else. Artillery support is limited to your platoon 60s. Our artillery is still getting organized in Bastogne and has not been able to keep up. If confronted by a large German counterattack with armor, call for support from HQ and we will try to dispatch some tanks from the remains of Team Cherry. However, it is possible no help will be forthcoming as they will be needed everywhere at once across this sector.
Objectives (select two capture, one hold):
Capture:
Main road exit
Eastern road exit
Bridge over creek
Hill 210
Hold:
Establish Platoon CP in village and hold (Platoon HQ)
Main road and trail crossroad
Creek bridge
Southern farm
German Briefing
Herr Leutnant,
Our great offensive has been temporarily halted. While some of our units withdraw to reorganize, we have been tasked with holding the line outside Bastogne in the hopes of a future counteroffensive. The Americans have broken out of our ring of steel at Bastogne, but they are already bogging down in our stubborn defense and the poor roads. Thanks to a Luftwaffe air offensive and our offensive in Alsace and Lorraine, it has drawn off most of the prowling American air support. Time is of the essence here. We must hold long enough and as far forward enough to buy time for our forces to regroup.
The town of Neffe is our first objective. It is one of the key roads out of Bastogne heading east. If we can stall the Americans here, we can help our forces fighting north of Foy. Our grenadiers must bear the brunt of the work as the panzers withdraw. However, a company from the Panzer Lehr division has been allocated to support this sector. There are not many of them, but since American armor is not expected in the immediate area, this should not be a problem. We have reports of only a platoon of American airborne troops in the town. If we strike fast, we can catch them before they are prepared.
Neffe has only one main road into the village. However, there are three other possible entry points: a valley stream, a small trail connecting the main road, and a small road that crosses the stream and links up with the main road behind the village. Use your scouts to locate and guide your squads in. Taking the secondary road that links up behind the village would be an ideal flanking mission. The stream will be little use to vehicles, but might be a way for infantry to sneak into the village. The main road is probably the most dangerous, as it will surely be covered by fire unless you act swiftly and get into town before the Americans. The trail is probably the most limited as it is merely a covered approach alternative to the main road.
Objectives (select 3 Capture):
Capture:
Village
Bridge over creek
Secondary road exit
Main road exit
Destroy or capture American troops
Destroy any American armor
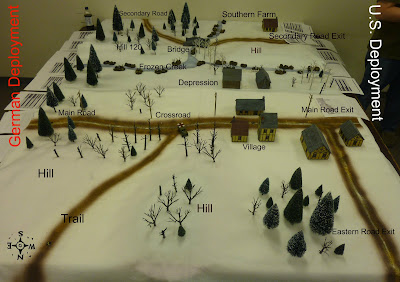
| The Table: 6'x8' (Deployment zones along 8' edge) |
The Forces:
U.S. Airborne
ACC: 5
CC: 6
Gut: Lt. (10), Platoon Sgt. (9), Sgt. (8), Corporal (7), Private (6)
T&E: Elite +2
1x Platoon HQ (Player 1):
1 Lt. w/ M1 Carbine
1 Platoon Sgt. w/ Thompson SMG
1 Medic
1 Radioman w/ Thompson SMG
2 Privates (Runners) w/ M1 Carbine
2x Rifle Squad (Players 2 & 3):
Rifle Team:
1 Sgt. w/ Thompson SMG
7 Privates w/ M1 Garand
LMG Team:
1 Corporal w/ M1 Garand
1 Private (LMG Gunner) w/ M1919A6 LMG
1 Private (Assistant) w/ M1 Carbine
1 Private (Assistant) w/ M1 Garand
1x 60mm Mortar Squad (Player 4):
1 Sgt. w/ M1 Carbine
1 Gunner w/ 60mm Mortar
2 Privates (Assistants) w/M1 Carbine
4 Privates (Ammo bearers) w/ M1 Garand
1x MMG Team (Player 1):
1 Sgt. w/ M1 Carbine
1 Private (Gunner) w/ M1919A4 HMG
1 Private (Assistant) w/ M1 Garand
2x Bazooka Teams (Player 1):
1 Private w/ Bazooka
1 Private w/ M1 Carbine/Thompson SMG
2x M4A3 Shermans (Player 1)
Note: The MMG, Bazooka Teams, and Shermans can be controlled by Player 1 or given to any other player in the U.S. Force.
Germans
ACC: 5
CC: 6
Gut: Lt. (9), Platoon Sgt. (8), Sgt. (7), Corporal (6), Private (5)
T&E: Veteran +1
1x Platoon HQ (Player 1):
1 Lt. w/ MP-40 SMG
1 Platoon Sgt. w/ MP-40
1 Radioman
2 Privates (Runners) w/ Kar-98k
3x Rifle Squads (Players 2, 3, & 4):
Rifle Team:
1 Sgt. w/ MP-40 SMG
6 Privates w/ Kar-98k
LMG Team:
1 Corporal w/ MP-40 SMG
1 Private (Gunner) w/ MG-42 LMG
1 Private (Assistant) w/ Kar-98k
1x Panzerschreck Team (Player 1):
1 Private w/ Panzerschreck
1 Private w/ Kar 98k
1x HMG Team (Player 1):
1 Corporal w/ MP-40 SMG
1 Private (Gunner) w/ MG-42 HMG
1 Private (Assistant) w/ Kar-98k
2x Panzer IV H (Player 1)
Note: The Panzerschreck Team, HMG, and Panzer IVs can be controlled by Player 1 or given to any other player in the German Force.
This game uses the rules system Disposable Heroes: Point Blank. In addition, we used some special rules for platoon sized games. These include rules for runners, ranging mortars and ammunition, as well as some of the special rules from Point Blank (add T&E to wound score).
The scenario also involved pre-game recon. Each platoon HQ player (Player 1) was allowed to make 3 recon attempts from a scout in each of his squads. We used the recon chart in the optional section of Disposable Heroes & Coffin for Seven Brothers (using the infantry entry). Failed recon rolls can mean the loss of the scout. Each scout may make multiple attempts to recon, but the chances of getting killed or captured go up (follow the rules for recon in DHC7B) except that instead of discovering hidden units there are different outcomes for each side:
For the U.S., recon attempts allow German units to be discovered and placed on the table before the U.S. deploys.
For the Germans, each of several locations on the German deployment side can be rolled for:
The Secondary Road
The Frozen Creek
The Trail
If a location is discovered, the Germans may bring troops onto the table at those locations within their deployment zone. If none of them are discovered, the Germans must come in on the main road and within 6" of either side.
Reinforcements: On turn three, the Germans may bring the third squad onto the table. The German platoon commander may make 2 last recon attempts to discover an entry location, or may use a location physically controlled by the German force. The U.S. Player may attempt to call for armored support by making a Skill Check (easy -1) by the radioman (considered specialist).
Each side is allowed one pre-game meeting to allow platoon commander's to give their initial orders and describe a battle plan. How they do this and what they decide is up to them, but their objectives are established by the scenario. This important because during the game, platoon commanders are not allowed to communicate instructions to their squads without sending runners. Runners can be sent to a squad. To do so, the player must measure to the squad leader he wishes to talk to, then he must measure the distance and spend the correct amount of Activations to send the runner (using the Command and Control rules from Point Blank). The runner is placed next to the squad leader for that Activation, and while there, the platoon commander may actually talk to the squad leader. After this Activation, the runner is automatically returned to the platoon HQ.
We also used rules for limited mortar ammo. The 60mm mortar squad arrives on the table with only 3 of each kind of round (smoke and HE). The mortar player must then send ammo bearers back to get more ammo during the game. This works by allowing an ammo bearer to go get ammo within a certain distance of the table edge during his Activation, and then return with 3 rounds. It is generally pretty easy to keep the tube supplied, but the ammo is not unlimited for the game.
The last special rules we used was ranging mortars. This allowed a mortar team to establish bonuses for firing on the same targets during the game. This was recorded on a special range card. This allowed the mortar team to dial in on a target and land more accurate rounds as the game went on...unless the target moved. Because the mortar team mostly fired smoke during the game and then got wiped out...this didn't seem to come into play!
Finally, we allowed platoon commanders to "give away" up to their T&E bonus in Activations to other players under their command at the beginning of each turn. This came in very handy at certain points in the game!
Once recon is complete, both sides rolled for Initiative. The winner decides whether his force deploys or the opponent.
The Game:
The pre-game recon went horribly for the Germans. And by horribly, I mean that there was not a single location successfully discovered AND all three scouts were lost.
The Germans also lost initiative to start.
The game began with the Germans piling their squads along the main road. Thankfully the U.S. were not in good positions to cover them with fire yet, so there was some room to shake out into better terrain.
| Neffe, |
| Skirmish line. |
| Germans use a Panzer IV to advance. |
The U.S. quickly moved their troops into the town of Neffe and sent a squad towards the bridge. The push towards the bridge is assisted by the smoke from the 60mm mortars which put down a nicely targeted and dense smoke screen.
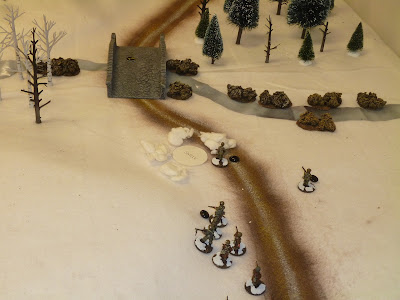
| U.S. advance on the bridge using smokescreen from the 60mm mortar. |
The German squad in the middle along the main road started to put pressure on the U.S. troops in the town, but also began to take casualties of its own.
Meanwhile, one of the Panzer IVs came to life and started blazing away at U.S. targets, first in the barn of the middle farm, then in the village. To deal with this armored threat, a U.S. bazooka team fired at the Panzer IV and knocked a track off, immobilizing it for the game.
| Immobilized Panzer IV. |
| Brew up! A Sherman goes up in flames. |
On the German left, the recently arrived rifle squad tried to push towards the bridge only to be pushed back into the woods by the U.S. troops that had made it to the bridge under the smokescreen.
For some unknown reason, the U.S. moved up their 60mm mortar team to the farm in the middle. From here they were greeted by the immobilized Panzer IV with several HE rounds from the main gun and withering hull MG fire. The 60mm mortar squad is all but wiped out.
In the tank duel, the Panzer IV landed a killing blow on the second Sherman and sent the turret skyward in a ball of fire.
| "Hey sarge, what are we doing here? Isn't that a German tank over there?" |
The end of the game saw the U.S. in a better position than the Germans.
All in all, it was a very fun and intense game, with some very heroic moments as well as some tough fighting. The players generally didn't use the platoon runner communication rules.
Thanks to the guys at the club for playing. Chalfant, Tony, Greg, Dieter, Rob, and I had a good time. We could have used an extra 2 players, but made do with what we had.
I look forward to the next big platoon level game with Disposable Heroes: Point Blank. The rules play fast with each player controlling a squad, and with a large table, the ground scale looks pretty good in 28mm.
Labels:
Artizan Designs,
Disposable Heroes: Point Blank,
German,
U.S.,
WWII
Monday, October 17, 2011
Introducing...Disposable Heroes: Point Blank!
With the imminent release of Iron Ivan Games newest wargame system, Disposable Heroes: Point Blank, I thought I would take the time to post a short 1 turn battle report to show how the system plays.
Disposable Heroes: Point Blank is our newest system and is our first 1:1 individual skirmish set. The rules are designed to allow players to game pretty much any modern fire arms period from WWI all the way up to today and beyond. Players will find that Point Blank allows for fast and intense tactical action while allowing for an almost role play element without all of the complexity of an RPG or traditional overly detailed crunchy simulation. The focus of the rules is on tactical decision making and every player's action can alter the course of a fight. There are rules for infantry, support weapons, vehicles and artillery. The scope of the game is squad level, where players control roughly a squad of soldiers and perhaps a support weapon or vehicle. Players are controlling individual soldiers, weapon teams, and vehicles. Larger games are possible with multiple players, yet even single players can handle two squads. The rules provide lists for WWII, Vietnam, and modern forces.
On to the battle!
For this battle, I chose one of my favorite conflicts: WWII, and one of my favorite periods of the war: France 1940.
The forces:
German Activation 6: The ATR team once again puts a round into the side of the Panhard. The shot bounces off, but the ATR gunner reloads and lets fly again. This time the round penetrates the hull. The vehicle suffers minimal damage but suppresses the crew.
French Activation 6: The Panhard decides that discretion is the better part of valor and pulls back down off the elevated roadway and out of sight of the ATR team.
German Activation 7: The German LMG fire is beginning to take it's toll. The French LMG team is now heavily suppressed.
French Activation 8: A French rifleman lets loose with a rifle grenade at the German LMG team near the shed to try to take them out. The round explodes harmlessly nearby, but does cause the LMG team to be lightly suppressed.
Disposable Heroes: Point Blank is our newest system and is our first 1:1 individual skirmish set. The rules are designed to allow players to game pretty much any modern fire arms period from WWI all the way up to today and beyond. Players will find that Point Blank allows for fast and intense tactical action while allowing for an almost role play element without all of the complexity of an RPG or traditional overly detailed crunchy simulation. The focus of the rules is on tactical decision making and every player's action can alter the course of a fight. There are rules for infantry, support weapons, vehicles and artillery. The scope of the game is squad level, where players control roughly a squad of soldiers and perhaps a support weapon or vehicle. Players are controlling individual soldiers, weapon teams, and vehicles. Larger games are possible with multiple players, yet even single players can handle two squads. The rules provide lists for WWII, Vietnam, and modern forces.
On to the battle!
For this battle, I chose one of my favorite conflicts: WWII, and one of my favorite periods of the war: France 1940.
The forces:
German Motorized Infantry Squad
Accuracy: 5, Close Combat: 6, Guts: 9/8/7, Training and Experience: Trained +0.
Squad Leader (Sergeant) with MP-38 and Luger pistol.
Squad Leader (Corporal) with Kar-98k rifle.
2x Light Machine Gun team with MG-34 LMG and Kar-98k rifle (assistant).
4x Riflemen with Kar-98k rifle.
Anti Tank Rifle Team with PzB38 and Kar-98k rifle (assistant).
Anti-Tank Gun Team with Pak 36 and Kar-98k rifles (assistants) (led by Corporal).
French Dragons Portes Squad
Accuracy: 5, Close Combat: 6, Guts: 8/7/6, Training and Experience: Veteran +1.
Squad Leader (Sergeant) with Fusil Mle 1916 rifle.
Squad Leader (Corporal) with Fusil Mle 1916 rifle.
2x Light Machine Gun team with FM-24/29 LMG and Fusil Mle 1916 rifle (assistant).
3x Riflemen with Fusil Mle 1916 rifle and 1x rifleman with Fusil Mle 1916 VB grenade launcher.
Panhard 178 Armored Car.
Both sides are roughly 200 points. The system has a points system available for those who like to use them, but it is NOT designed as a tournament style points system. It is just a way of coming up with a number for when you create historically based squads and their worth in terms of rules function only (stats and weapon costs).
My rationale for the French having a higher T&E score is that these are Dragons Portes. The kind of troops in the French Army who had been given special training in combined arms warfare and who had the higher esprit de corps of armored infantry units. Their Gut score is standard reflecting that they might have at one point had a higher morale score but the French campaign in 1940 was not going well, so it evened out.
The German Guts and T&E was based on the idea that they had a higher Guts because they were on the winning side in the campaign of 1940 and were pushing towards a (hard fought) victory, but their T&E was simply trained (+0) to show that while the unit might have had experience in Poland in 1939, with the high casualties in that campaign and the influx of new recruits for this operation, it evened out. What this meant was that the French were better trained, but slightly more shaky in morale, while the Germans had higher morale but were nothing special in training.
One of the fun parts of the game is coming up with interesting combinations of stats that reflect lots of different potential troops types. That way you aren't stuck with "Germans are always elite with better morale". Now you have two dimensions with which to represent troop quality. Want to do fanatical but poorly trained troops such as the Hitlerjugend units in the fall of Berlin? Give them an Elite Guts score (10 scale) but poor Training & Experience (Poor -2). There are tons of possibilities.
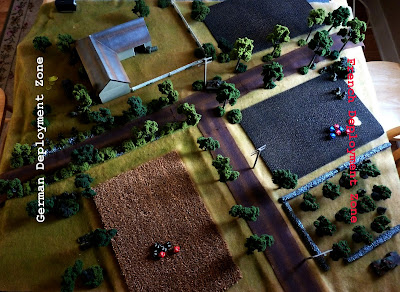
The scenario itself is a pretty straightforward meeting engagement type of combat patrol, though the Germans are in a slightly more defensive posture. The table set up is as shown below. The German deployment zone goes down the left side of the table while the French deployment is on the right. The scenario is that a French R-35 has been knocked out on a road leading to a German salient (the crew escaped). The French are attempting to locate and destroy the Pak 36 that knocked out the tank. The French Dragons Portes squad is attacking just as the Germans are moving up troops to expand out of the salient.
My rationale for the French having a higher T&E score is that these are Dragons Portes. The kind of troops in the French Army who had been given special training in combined arms warfare and who had the higher esprit de corps of armored infantry units. Their Gut score is standard reflecting that they might have at one point had a higher morale score but the French campaign in 1940 was not going well, so it evened out.
The German Guts and T&E was based on the idea that they had a higher Guts because they were on the winning side in the campaign of 1940 and were pushing towards a (hard fought) victory, but their T&E was simply trained (+0) to show that while the unit might have had experience in Poland in 1939, with the high casualties in that campaign and the influx of new recruits for this operation, it evened out. What this meant was that the French were better trained, but slightly more shaky in morale, while the Germans had higher morale but were nothing special in training.
One of the fun parts of the game is coming up with interesting combinations of stats that reflect lots of different potential troops types. That way you aren't stuck with "Germans are always elite with better morale". Now you have two dimensions with which to represent troop quality. Want to do fanatical but poorly trained troops such as the Hitlerjugend units in the fall of Berlin? Give them an Elite Guts score (10 scale) but poor Training & Experience (Poor -2). There are tons of possibilities.
The scenario itself is a pretty straightforward meeting engagement type of combat patrol, though the Germans are in a slightly more defensive posture. The table set up is as shown below. The German deployment zone goes down the left side of the table while the French deployment is on the right. The scenario is that a French R-35 has been knocked out on a road leading to a German salient (the crew escaped). The French are attempting to locate and destroy the Pak 36 that knocked out the tank. The French Dragons Portes squad is attacking just as the Germans are moving up troops to expand out of the salient.
Here is the table:
The game began with a roll for initiative. The Germans rolled a 9 and added their Guts of 9 plus their T&E of +0 for an 18. The French lost by rolling a 4 and adding their Guts of 8 plus their T&E of +1 for a 13.
The German player receives 9 Activations he may use during the turn (Guts of 9 plus T&E 0=9). The French also get 9 Activations (Guts of 8 plus T&E of +1=9). The report is a single turn from a game.
German Activation 1: The Germans decide to go first. The German player moves his LMG team up to the corner of the farm shed.
French Activation 1: The French LMG team moves up to the edge of the road looking down a long gulley alongside the road and sees a column of German troops. The French let fly with a burst of LMG fire and manage to suppress one of the German riflemen at the lead of the column.
German Activation 2: The two rifles behind the lead share their Action Points to scatter out of the ditch and onto the road or into the bushes. This leaves the lead and the last rifle in the column exposed in the ditch.
French Activation 2: The same LMG that had suppressed the lead German in the ditch puts more fire downrange. After failing his Gut Check and becoming suppressed, the German player decides to have his rifleman Fall Back. This move allows him to shake off some of his suppression now that he is in a better position away from the deadly hail of fire.
German Activation 3: A second German LMG team moves up into a firing position and is able to set up a Crossfire with the other German LMG team (this makes LMG fire more effective). The first burst does not find its mark, but this Crossfire will come into play later.
French Activation 3: The French LMG team continues to pour fire into the ditch, this time dropping one of the exposed German riflemen, wounding him and removing him from the game.
German Activation 4: The 2nd LMG team begins to bring it's fire to bear on one of the French LMG teams that had been firing down the ditch. The fire causes the French team to become suppressed, momentarily silencing their gun. The German LMG's assistant was able to help keep the German gun in action, despite a jam during firing.
French Activation 4: A French Panhard 178 Armored Car arrives on the scene and moves onto the road. It turns it's turret and finds a German LMG team in the sights. After acquiring the target, the Panhard lets loose with a blast of 25mm cannon and some machine gun fire. The German LMG team is hit and the assistant is wounded while the gunner is suppressed.
German Activation 5: The German player does not like this new French arrival and sends his Anti-Tank Rifle team over to try to knock out this armored threat. The ATR moves up and finds a firing position. He hits the Panhard, but the round bounces off. He then quickly reloads so he is ready to fire again next time.
French Activation 5: The French corporal wants to get the LMG team back into action, so he rallies them by waving his arms wildly and shouting.
French Activation 1: The French LMG team moves up to the edge of the road looking down a long gulley alongside the road and sees a column of German troops. The French let fly with a burst of LMG fire and manage to suppress one of the German riflemen at the lead of the column.
German Activation 2: The two rifles behind the lead share their Action Points to scatter out of the ditch and onto the road or into the bushes. This leaves the lead and the last rifle in the column exposed in the ditch.
French Activation 2: The same LMG that had suppressed the lead German in the ditch puts more fire downrange. After failing his Gut Check and becoming suppressed, the German player decides to have his rifleman Fall Back. This move allows him to shake off some of his suppression now that he is in a better position away from the deadly hail of fire.
German Activation 3: A second German LMG team moves up into a firing position and is able to set up a Crossfire with the other German LMG team (this makes LMG fire more effective). The first burst does not find its mark, but this Crossfire will come into play later.
French Activation 3: The French LMG team continues to pour fire into the ditch, this time dropping one of the exposed German riflemen, wounding him and removing him from the game.
German Activation 4: The 2nd LMG team begins to bring it's fire to bear on one of the French LMG teams that had been firing down the ditch. The fire causes the French team to become suppressed, momentarily silencing their gun. The German LMG's assistant was able to help keep the German gun in action, despite a jam during firing.
French Activation 4: A French Panhard 178 Armored Car arrives on the scene and moves onto the road. It turns it's turret and finds a German LMG team in the sights. After acquiring the target, the Panhard lets loose with a blast of 25mm cannon and some machine gun fire. The German LMG team is hit and the assistant is wounded while the gunner is suppressed.
German Activation 5: The German player does not like this new French arrival and sends his Anti-Tank Rifle team over to try to knock out this armored threat. The ATR moves up and finds a firing position. He hits the Panhard, but the round bounces off. He then quickly reloads so he is ready to fire again next time.
French Activation 5: The French corporal wants to get the LMG team back into action, so he rallies them by waving his arms wildly and shouting.
German Activation 6: The ATR team once again puts a round into the side of the Panhard. The shot bounces off, but the ATR gunner reloads and lets fly again. This time the round penetrates the hull. The vehicle suffers minimal damage but suppresses the crew.
French Activation 6: The Panhard decides that discretion is the better part of valor and pulls back down off the elevated roadway and out of sight of the ATR team.
German Activation 7: The German LMG fire is beginning to take it's toll. The French LMG team is now heavily suppressed.
French Activation 7: A French rifleman makes a dash forward to attempt to get into a better position.
German Activation 8:The German LMG team's fire is becoming so effective, that the French LMG team decides to Fall Back away from the fire and into a (slightly) safer position.
French Activation 8: A French rifleman lets loose with a rifle grenade at the German LMG team near the shed to try to take them out. The round explodes harmlessly nearby, but does cause the LMG team to be lightly suppressed.
German Activation 9: The German Corporal rallies his LMG team to get them back into action. They quickly draw a bead on the French corporal who had been rallying his men while standing along the road. The burst misses, but causes the corporal to become suppressed after ingloriously diving off the road and into the ditch away from the fire.
French Activation 9: The French player moves up an LMG team desperately needed to try to wrest control of the firefight away from the Germans. The team moves up into an orchard.
With that, the first turn of the game comes to an end. The next turn would begin with a new roll for initiative. The Germans have taken two casualties, so would be down two Activations on the next turn, and their initiative will be taking a hit. The French are not in a good position, but they have not taken any casualties. However, their firepower is either not in a good position, or is heavily suppressed. It will be hard to tell how the next turn will go.
Will the Germans be able to even the score? What is the Panhard going to do? Do the French have enough maneuver room to bring up their firepower and push the Germans? Where is that Pak 36 lurking? Will the French be able to move some of their rifles into close range and unhinge the German position? Will the Germans launch their own counterattack now that they have suppressed some of the French?
I hope you enjoyed the battle report. This is only a small taste of what the rules set allows you to do. This game went very quickly and the action flows from moment to moment in ways that are tense and challenging. We didn't even cover the use of skill checks or spotting and hidden rules. That will be another game for another day.
Disposable Heroes: Point Blank is a 100 page book crammed from cover to cover with solid gaming action. We hope to release the game at Fall In this year in Lancaster, but this is depending on printing time. As always we will be taking preorders for the book as soon as we are sure we ready to go. Stay tuned!
Will the Germans be able to even the score? What is the Panhard going to do? Do the French have enough maneuver room to bring up their firepower and push the Germans? Where is that Pak 36 lurking? Will the French be able to move some of their rifles into close range and unhinge the German position? Will the Germans launch their own counterattack now that they have suppressed some of the French?
I hope you enjoyed the battle report. This is only a small taste of what the rules set allows you to do. This game went very quickly and the action flows from moment to moment in ways that are tense and challenging. We didn't even cover the use of skill checks or spotting and hidden rules. That will be another game for another day.
Disposable Heroes: Point Blank is a 100 page book crammed from cover to cover with solid gaming action. We hope to release the game at Fall In this year in Lancaster, but this is depending on printing time. As always we will be taking preorders for the book as soon as we are sure we ready to go. Stay tuned!
Friday, September 23, 2011
Something a Little Different. Warhammer 40,000: Space Marine (PC game) Review.
Something a little different than my usual wargaming related posts. Recently I picked up and have played part way through the new PC title Warhammer 40,000: Space Marine.
Overall Review: Excellent game on almost every level with only a few minor quibbles.
Visuals: Amazing. To start, they really took the 40k gothic visuals and created a convincing and awe inspiring landscape. Amazing detail down to the very nuts and bolts. Dark, gritty, ruined, gothic. Everything 40k is supposed to be without going over the top, which is even more impressive. The models look amazing. This is what space marines are supposed to look like. Plus, the animations are fluid and realistic, and the voice acting and characters are done really well. What's more, the action animations and the pure carnage factor is stunning. The power a single marine is able to unleash in this game truly does these 40k legends justice. You can literally become a walking engine of death and cut a swathe of destruction.
Gameplay: This is where it gets even better. This game delivers on the action. What I really like is that not only does the game allow you to seamlessly switch from ranged to melee combat, both styles of combat have their place. There are parts of the game where it is better to stay ranged, use cover and gun down the waves of enemies. Other times there is nothing for it but to wade into the enemy and brutally hack and slash your way through. In fact, there are times when if you choose the wrong approach, you will find yourself gunned down from long range or swamped and cut to pieces in a wave of death. This balance of gameplay is not only important, it is impressive that they executed it so damned well. Space Marines are great at both roles. I personally prefer the ranged approach, and there is something satisfying standing back and gunning down waves of Orks with head shots from a standard bolter. Even more awesome is the power of a melta gun at close range.
Story and Level Design: This is a mixed bag. The story is very cool and the plot is pure 40k. Ork invasions, an Inquisitor, a Forge World, and even a somewhat competent Imperial Guard force swirl around the intrigue of a secret weapon and the attempt to prevent it from falling into Ork hands (or worse). So the story gets a plus from me. The only detraction was that there was not that much character interaction beyond short (sometimes too short) cut scenes. But hey, this is an action game and we are playing a Space Marine...so who cares?
Level design is where I will say that the game falls short, but only in some minor ways that can be easily overlooked. The levels are very linear. That's ok, but added to the next factor, I think it becomes mildly annoying. At every part of the level where your character needs something it just happens to be lying in an open crate, on the ground, or in a drop pod or Adepticus Mechanicus machine. In fact, the game delivers your skill ups in these awkward Adepticus Mechanicus consoles. Get to a part where you need to fly? Oh look! A jet pack conveniently located in a drop pod. Done with that zone? The jet pack runs out of fuel just in time. Does the zone ahead have a few mini boss type enemies where you need to use a Lascannon? Oh look! There's one! Done those mini bosses? Oh well, no more ammo for that weapon. I don't mind crates of ammo throughout a game, but the way this game delivers not only ammo, but the very tools you need to complete a part of the game comes across as kind of silly and predictable. Also, there are times when you lose a weapon you had, only to come across another one later on. It's all a very awkward element of the game design.
The strange part is the fact that while they handled level ups and weapons so awkwardly, they handled health really well. You regain your power field after waiting a short time out of combat. That makes sense as it recharges back up to full. Health is handled even more uniquely and in two related but different ways: you build up rage as you are in combat. Once your meter is full you can unleash the rage in a storm of energy. It adds health to you, slows time slightly and turns you into a killing machine. Even neater is how it can be used both in melee and ranged combat (melee allows you to land devastating blows, ranged allows for super accurate shooting). It functions as an almost trance like Matrix style state without being cheesy. Plus it is easy to use.
Also, there is the ability to regenerate health by first stunning an enemy and then delivering a killing blow. It is kind of awkward at first, but it quickly becomes second nature. Though sometimes it is a pain in the ass to line it up right, but that is part of the challenge. Also, you must time it right. Not all enemies can be stunned right away but must be damaged first. Also, if you don't time it right, your foe can counterattack. There is nothing more aggravating than being picked up and slammed down and then stomped on by an Ork nob. Of course, there is nothing more satisfying than delivering that vicious and gruesome killing blow back on him...
One of the things I really like is the way they designed the actual enemies you fight. The Orks are far more than just waves of chainsword and axe wielding maniacs. There are nobs, stormboys with jet packs, shoota boys, Weirdboy psykers, Armored boys with huge shields, gretchin mobs...everything you think of for the Orks which makes an old school 40k fanboy smile (my only gripe would be that it would be nice to see some variety of color and details on the models-every type of Ork always looks the same even though there are a bunch of different types). The best part about your enemies is that each type of encounter requires you to think about how to handle it. Shoota boys will quickly reduce your power field and start taking chunks out of your health if you stand in the open. If you get swamped by Orks you will find yourself unable to fight your way out.
So taken overall, this is one amazing game. It is a lot of fun. It is challenging in all of the ways I like, yet not needlessly frustrating or difficult for the sake of being difficult. The few minor gripes are annoying and mildly detracting from the experience. But overall, it is one solid game. I recommend it for anyone that is a big fan of 40k. I really hope they continue this series. I would love to go up against Eldar, Tyranids, or the other 40k universe baddies. Note: I have not yet completed the game. I understand that chaos forces make their appearance...I can't wait.
Overall Review: Excellent game on almost every level with only a few minor quibbles.
Visuals: Amazing. To start, they really took the 40k gothic visuals and created a convincing and awe inspiring landscape. Amazing detail down to the very nuts and bolts. Dark, gritty, ruined, gothic. Everything 40k is supposed to be without going over the top, which is even more impressive. The models look amazing. This is what space marines are supposed to look like. Plus, the animations are fluid and realistic, and the voice acting and characters are done really well. What's more, the action animations and the pure carnage factor is stunning. The power a single marine is able to unleash in this game truly does these 40k legends justice. You can literally become a walking engine of death and cut a swathe of destruction.
Gameplay: This is where it gets even better. This game delivers on the action. What I really like is that not only does the game allow you to seamlessly switch from ranged to melee combat, both styles of combat have their place. There are parts of the game where it is better to stay ranged, use cover and gun down the waves of enemies. Other times there is nothing for it but to wade into the enemy and brutally hack and slash your way through. In fact, there are times when if you choose the wrong approach, you will find yourself gunned down from long range or swamped and cut to pieces in a wave of death. This balance of gameplay is not only important, it is impressive that they executed it so damned well. Space Marines are great at both roles. I personally prefer the ranged approach, and there is something satisfying standing back and gunning down waves of Orks with head shots from a standard bolter. Even more awesome is the power of a melta gun at close range.
Story and Level Design: This is a mixed bag. The story is very cool and the plot is pure 40k. Ork invasions, an Inquisitor, a Forge World, and even a somewhat competent Imperial Guard force swirl around the intrigue of a secret weapon and the attempt to prevent it from falling into Ork hands (or worse). So the story gets a plus from me. The only detraction was that there was not that much character interaction beyond short (sometimes too short) cut scenes. But hey, this is an action game and we are playing a Space Marine...so who cares?
Level design is where I will say that the game falls short, but only in some minor ways that can be easily overlooked. The levels are very linear. That's ok, but added to the next factor, I think it becomes mildly annoying. At every part of the level where your character needs something it just happens to be lying in an open crate, on the ground, or in a drop pod or Adepticus Mechanicus machine. In fact, the game delivers your skill ups in these awkward Adepticus Mechanicus consoles. Get to a part where you need to fly? Oh look! A jet pack conveniently located in a drop pod. Done with that zone? The jet pack runs out of fuel just in time. Does the zone ahead have a few mini boss type enemies where you need to use a Lascannon? Oh look! There's one! Done those mini bosses? Oh well, no more ammo for that weapon. I don't mind crates of ammo throughout a game, but the way this game delivers not only ammo, but the very tools you need to complete a part of the game comes across as kind of silly and predictable. Also, there are times when you lose a weapon you had, only to come across another one later on. It's all a very awkward element of the game design.
The strange part is the fact that while they handled level ups and weapons so awkwardly, they handled health really well. You regain your power field after waiting a short time out of combat. That makes sense as it recharges back up to full. Health is handled even more uniquely and in two related but different ways: you build up rage as you are in combat. Once your meter is full you can unleash the rage in a storm of energy. It adds health to you, slows time slightly and turns you into a killing machine. Even neater is how it can be used both in melee and ranged combat (melee allows you to land devastating blows, ranged allows for super accurate shooting). It functions as an almost trance like Matrix style state without being cheesy. Plus it is easy to use.
Also, there is the ability to regenerate health by first stunning an enemy and then delivering a killing blow. It is kind of awkward at first, but it quickly becomes second nature. Though sometimes it is a pain in the ass to line it up right, but that is part of the challenge. Also, you must time it right. Not all enemies can be stunned right away but must be damaged first. Also, if you don't time it right, your foe can counterattack. There is nothing more aggravating than being picked up and slammed down and then stomped on by an Ork nob. Of course, there is nothing more satisfying than delivering that vicious and gruesome killing blow back on him...
One of the things I really like is the way they designed the actual enemies you fight. The Orks are far more than just waves of chainsword and axe wielding maniacs. There are nobs, stormboys with jet packs, shoota boys, Weirdboy psykers, Armored boys with huge shields, gretchin mobs...everything you think of for the Orks which makes an old school 40k fanboy smile (my only gripe would be that it would be nice to see some variety of color and details on the models-every type of Ork always looks the same even though there are a bunch of different types). The best part about your enemies is that each type of encounter requires you to think about how to handle it. Shoota boys will quickly reduce your power field and start taking chunks out of your health if you stand in the open. If you get swamped by Orks you will find yourself unable to fight your way out.
So taken overall, this is one amazing game. It is a lot of fun. It is challenging in all of the ways I like, yet not needlessly frustrating or difficult for the sake of being difficult. The few minor gripes are annoying and mildly detracting from the experience. But overall, it is one solid game. I recommend it for anyone that is a big fan of 40k. I really hope they continue this series. I would love to go up against Eldar, Tyranids, or the other 40k universe baddies. Note: I have not yet completed the game. I understand that chaos forces make their appearance...I can't wait.
Thursday, August 4, 2011
"All Gone Dead"
Continuing with the 80s post nuclear project theme music: Subhumans "All Gone Dead" was always one of my favorite punk songs of all time. I used to think it was such a powerful expression of the fear of a nuclear attack. Growing up near TMI, I always feared hearing the sirens for either a meltdown or some other kind of emergency. Add to that some powerful movies from the time and an active imagination and nuclear war was something that really worried me when I was younger.
Today, as a history teacher, I sometimes find it hard to explain to young students the feeling of growing up during the Cold War. How do you explain the fear of the real possibility of a nuclear war between us and the Soviets? (What's a Soviet?) It's just hard to put into words sometimes without sounding strange or silly. Maybe that's because our worst fears from the Cold War never happened, but in light of our recent experience with real terrorist attacks, the 80s US vs Soviet nuclear war hysteria now just kind of seems like something from a strange dream or a bad movie.
I was a little young for the "Duck and Cover" of my parent's generation, but I remember well things like Red Dawn and The Day After (and then later, the blast scene from T2). Punk really pulled all of that hysteria and fear together into some powerful imagery and music. It all sounds and looks kind of silly now, but back then the feeling of fear was palpable at times.
Inspired by my teenage fears and taste in music, I decided my post nuclear what-if project needed some appropriate scenery to go with it. I need that burned out landscape. The ruins I already have covered. What I don't have is cars. Burned out husks of cars. Nothing says post apocalypse like burned out cars.
All I had in my basement was a box of 1960s die cast cars (Franklin Mint I believe). Most of them weren't worth much or were too bad a condition to sell. So I decided to wreck 'em. I took the windshields out and removed the tires (those never survive nuclear blasts). After Googling some pics of burned cars, I decided I wanted to go with a extremely wrecked and completely torched look. I kept thinking of the kind of cars you see in the future scenes of T2 and stuff like that.
Here is the result. They are 1960s American cars, but they look sufficiently wrecked to fit into any post nuclear landscape. I need a lot more of these though, and I plan on hitting the cheap die cast sources this week to see what else I can find.
The paint job is done by spray painting a base coat of Krylon Flat Camo Brown. After that I drybrush and stipple a gray primer color onto the flat areas and on the major body panels. Follow this with a drybrush of metal to stripped areas and other metal parts. After that I drybrush and stipple a rust brown color onto most of the edges, blending into the other colors. Finally, a last layer of bright rust orange is applied by drybrush to the edges and heavily rusted areas. A final very light drybrush of white overall pulls it all together.
Enjoy!
Remember kids! Duck and Cover! (and kiss your ass goodbye!)
"We've Got a Bigger Problem Now."
Following up on the Soviets are my US in MOPP Gear. These are some amazing minis, with great detail and accurate weapons and gear. You can see the faces inside the lenses. I hope Eureka follows these up with more heavy weapons and support like they did the Soviets.
While working on the Soviets put me in the mood for Sisters of Mercy, the US called for some classic Southern California 1980s punk...such as the Dead Kennedys. The song I thought of most was "We've Got a Bigger Problem Now" off In God We Trust Inc.
Here are the first painted examples. I have to finish painting the pack with helmets to make a more complete force.
Group shot.
M-60, M-16s, and M-203 Grenade Launcher.
While working on the Soviets put me in the mood for Sisters of Mercy, the US called for some classic Southern California 1980s punk...such as the Dead Kennedys. The song I thought of most was "We've Got a Bigger Problem Now" off In God We Trust Inc.
Here are the first painted examples. I have to finish painting the pack with helmets to make a more complete force.
Group shot.
M-60, M-16s, and M-203 Grenade Launcher.
"Mother Russia Rain Down, Down, Down!"
I have been in an 80s mood lately. Especially after picking up Eureka's 1980s US in MOPP Gear (not on their site yet). I had been hoping they would release them to go against my Soviets, seen here. Eureka did not disappoint, with yet more amazing work by Kosta Heristanidis. These US in MOPP were released just in time for Historicon. Now my Soviets have something to fight other than zombies.
I really wanted to use these minis for a post-nuclear/chemical/biological setting...as grim and gruesome as that is. I began to look into some WWIII trigger ideas starting around the early 80s and came across some ideas from asking around on the TMP Modern "What If" message board and reading some of the other topics. Besides the massive NATO training exercises called Exercise Reforger (Return Forces to Germany), I came across this little lesser known trigger:
Able Archer '83
What if this had set off WWIII? It is an interesting what if, is around the right time that fits the miniatures, and it is a good wargaming scenario design basis for anything from full scale global nuclear war down to limited tactical nuclear exchange followed by conventional warfare. With this in mind, I got busy painting up the rest of the Soviets I had to finish and starting on my US.
Here are the Reds. You'll just have to forgive the amateurish artistic license I took with the photo editing. I couldn't resist the grainy film setting to help add some period style to the otherwise crappy pics I ended up with.
Command HQ.
Fire Team 1.
Fire Team 2.
Cover!
"Mother Russia...Mother Russia...Mother Russia rain down, down down..."
I really wanted to use these minis for a post-nuclear/chemical/biological setting...as grim and gruesome as that is. I began to look into some WWIII trigger ideas starting around the early 80s and came across some ideas from asking around on the TMP Modern "What If" message board and reading some of the other topics. Besides the massive NATO training exercises called Exercise Reforger (Return Forces to Germany), I came across this little lesser known trigger:
Able Archer '83
What if this had set off WWIII? It is an interesting what if, is around the right time that fits the miniatures, and it is a good wargaming scenario design basis for anything from full scale global nuclear war down to limited tactical nuclear exchange followed by conventional warfare. With this in mind, I got busy painting up the rest of the Soviets I had to finish and starting on my US.
Here are the Reds. You'll just have to forgive the amateurish artistic license I took with the photo editing. I couldn't resist the grainy film setting to help add some period style to the otherwise crappy pics I ended up with.
Command HQ.
Fire Team 1.
Fire Team 2.
Cover!
For inspiration, I have been listening to Sisters of Mercy's "Dominion/Mother Russia".
Subscribe to:
Posts (Atom)